With your studio information added, a price sheet created, and at least one organization added to your studio panel, you can begin creating and promoting your jobs. A “job” within PhotoDay is any picture day shoot, its associated information, the photos it will eventually include, and any promotional flyers created for that specific job.
A job acts as the “behind the scenes” set up for a customer-facing gallery.
Gallery Access
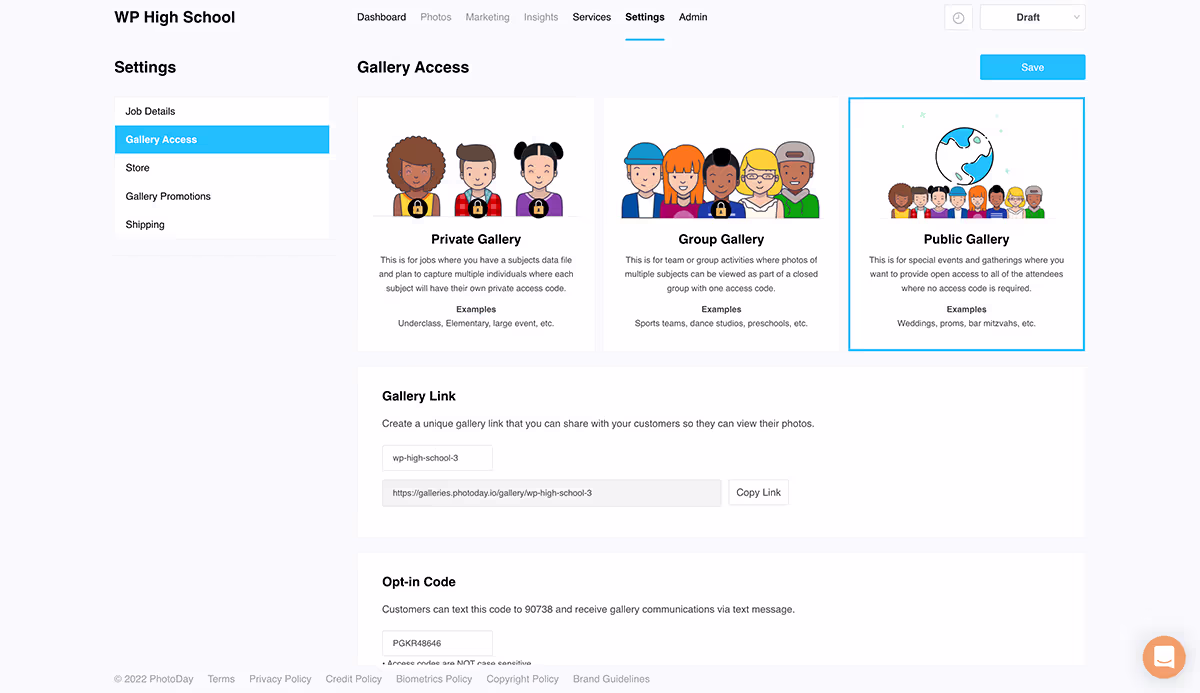
When it comes to job creation, we understand that different jobs have different needs. PhotoDay's 3 different gallery types give you full customization of how customers access and view their photos. All while making your work shine.
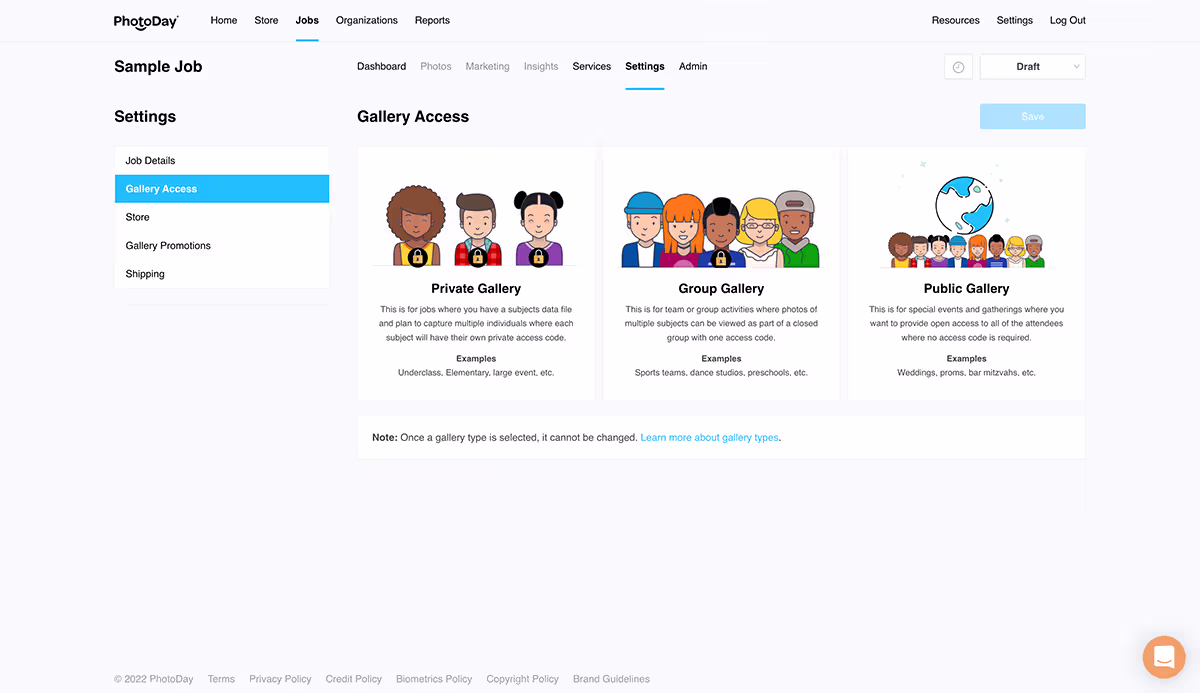
- Private galleries are for when you want every subject to have their own private gallery access code within one main job. These galleries use subject data to create private sub-galleries for each individual photographed. Private galleries are used in conjunction with the Capture App, which automatically matches subject data with professional photos using FaceFind. For a detailed rundown of the workflow involving the PhotoDay Capture app, check out the private galleries guide! It’s perfect for preschools, elementary, underclass, and more!
- Group galleries are for when you want to have one group access code. A group gallery has one access code that’s required to enter the gallery, but all participants can see all of the photos. Customers can quickly find their photos via FaceFind, Tags, or View All Photos (search options can be toggled on/off as desired for maximum flexibility). It's perfect for sports teams, dance schools, and more!
- Public galleries are for when you want to provide open access to all of the attendees. A public gallery can be viewed via a direct link and does not require an additional access code to enter. One access code can be created for customers to subscribe or enter from galleries.photoday.io without the direct link. Customers can quickly find their photos via FaceFind, Tags, or View All Photos (search options can be toggled on/off as desired for maximum flexibility). It’s perfect for sports, special events, group activities, graduations, and more!
You can view customer-facing examples of each gallery type here. Determining what kind of gallery access is best for your picture day is up to you, but now that you know the different types, let’s add a new job!
Adding a New Job
From the Home page of your Studio Panel, click on Jobs from the menu at the top of the page or click on the ••• in the Jobs section in the middle of the page.
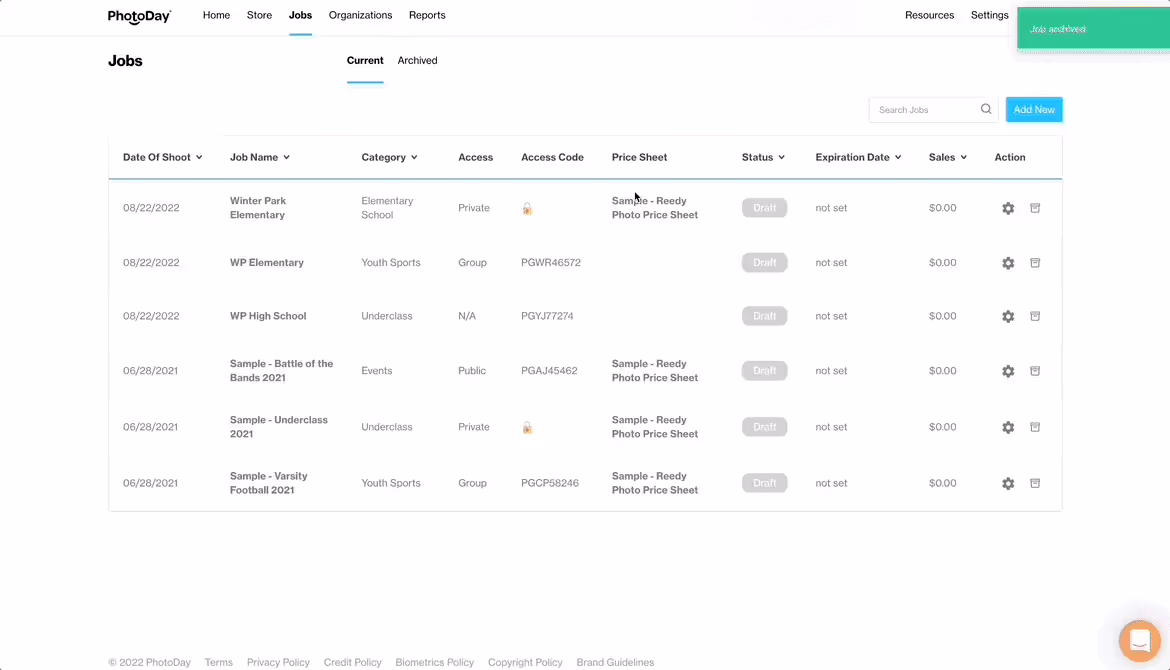
If this is your first time creating a job, this page will be empty aside from three example jobs each representing a different gallery type. This is where every job you create will be listed, along with its associated information including its access code (if applicable), gallery type, date of the shoot, and much more.
To create a new job, click on the Add New button on the top right of the page.
This will open the Job Information window, prompting you to name your job and associate it with an organization. If you need to add a new organization, just click the + button and a window will pop up for you to create a new one.
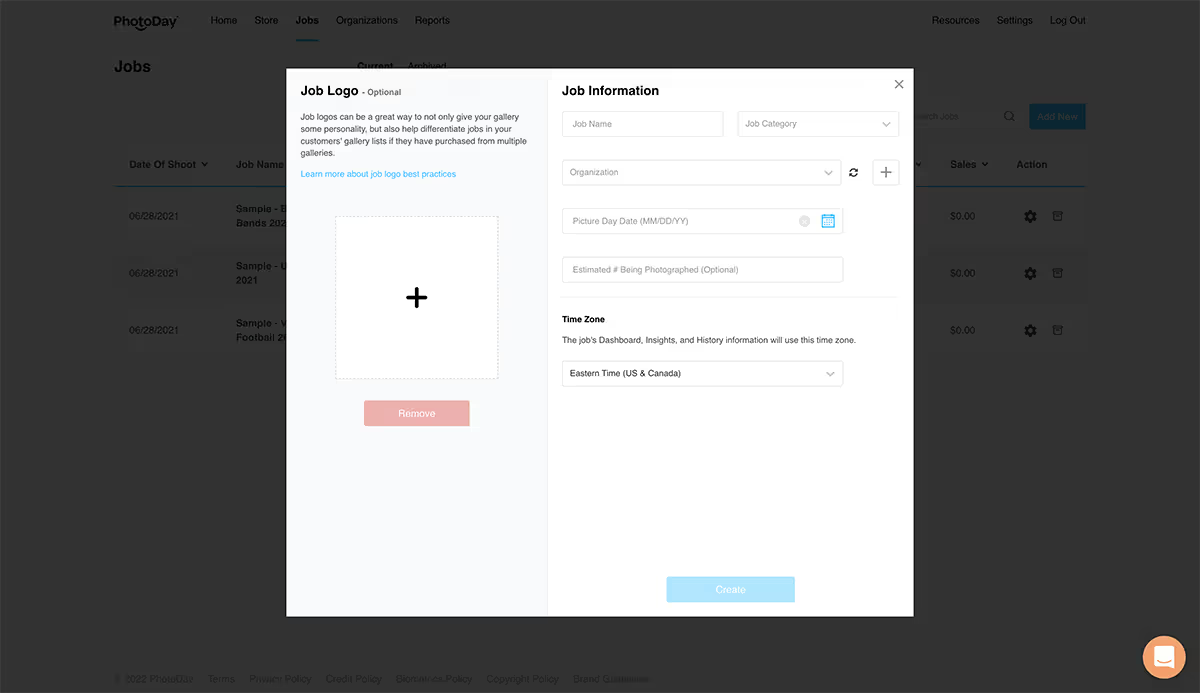
Choose a job category from the drop-down menu. This will determine the kind of customizable themes for specialty products that will be available to your customers once they check out.

Next, enter the date of the picture day. This will be used for both organizational purposes, as well as for promoting your gallery. Optionally, you can enter the estimated amount of individuals that will be photographed. Lastly, you will need to enter the time zone in which this job will take place (by default, PhotoDay will list this as Eastern unless changed).
You can also upload a job logo (a custom graphic to represent your job) in this window. Job logos can be a great way to not only give your gallery some personality but also help differentiate jobs in your customers' gallery lists if they have purchased from multiple galleries. They can also be included on marketing flyers and on Memory Mates with some labs (simply switch the toggle on to use the job logo on applicable themes).
Job logos should be relatively square in dimension, as the image will be cropped within a circle when displayed, and must be a PNG image file that is under 15MB in size. Learn more about job logos.
Here’s an example of customer-facing galleries with and without job logos:
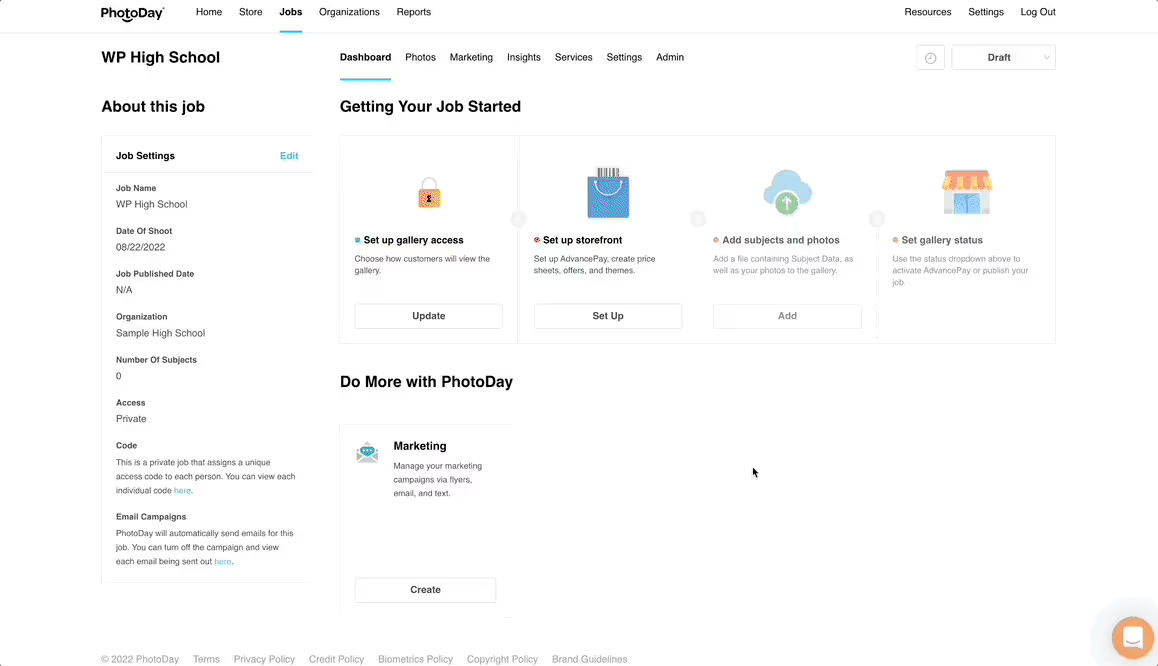
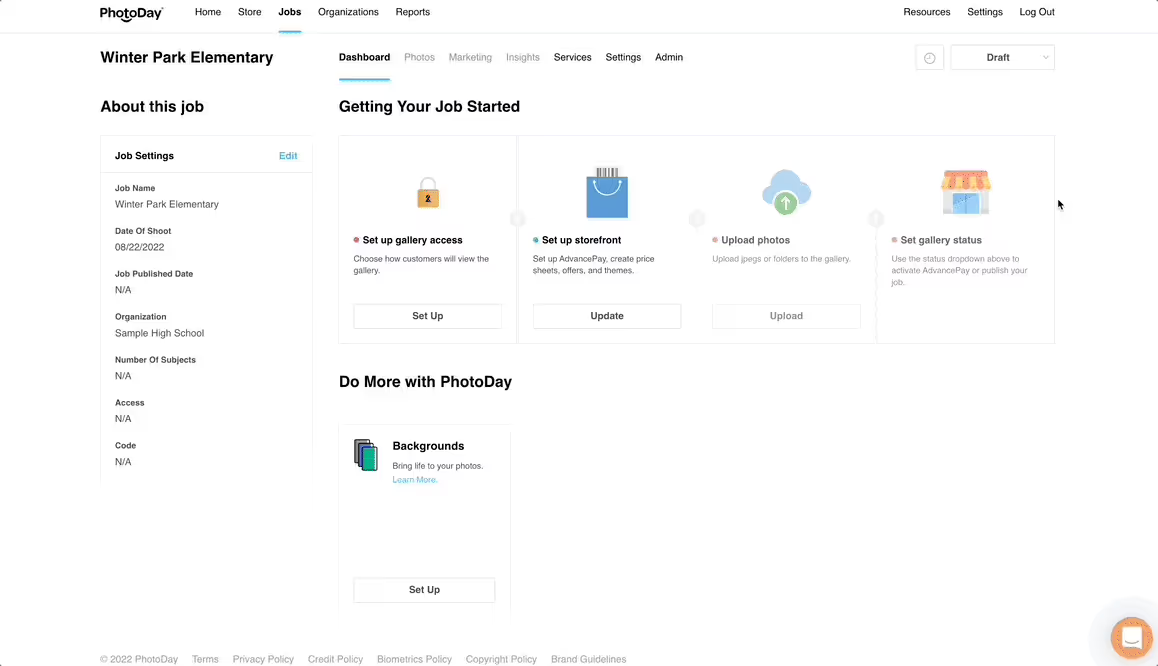
When you’re happy with your job settings, click the Create button (you can always update these settings within the job later). This will open the newly created job’s Dashboard page.
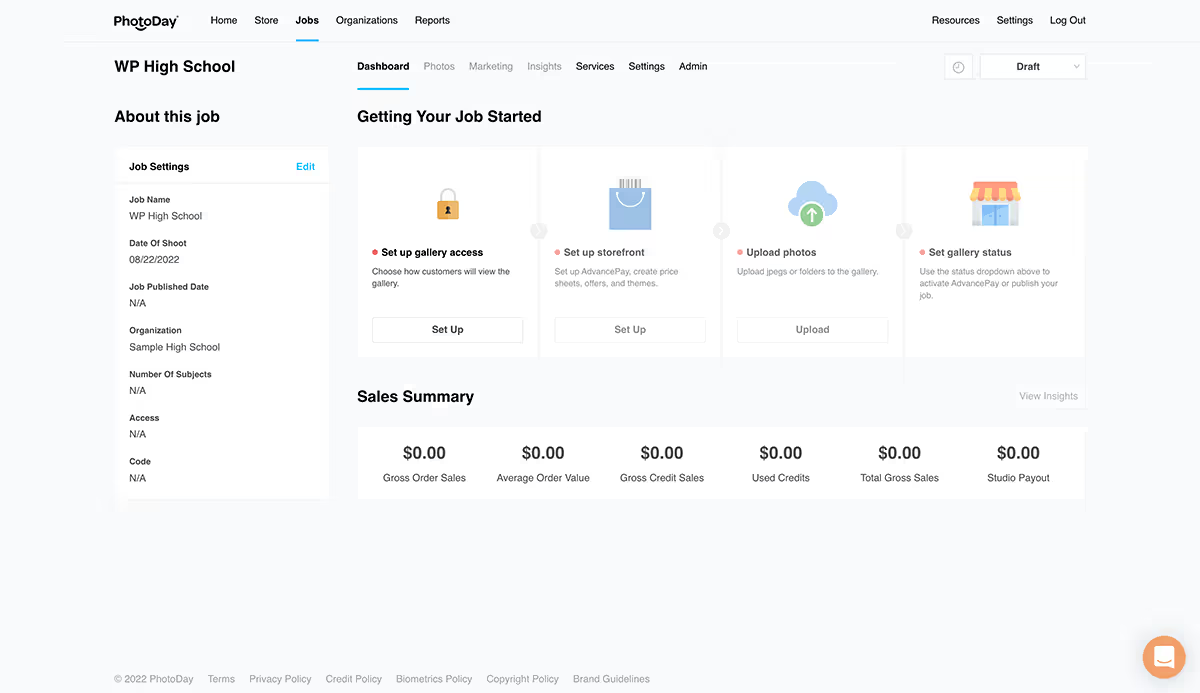
This page will walk you through the creation process—from selecting the gallery type to publishing. To get started, click the Set Up button under Set Up Gallery Access.
Set Up Gallery Access
It’s time to select your gallery access for the job. Please note: Once a gallery type is selected, it cannot be changed.
When you select a gallery type, some customization options will appear below.
Private Gallery:
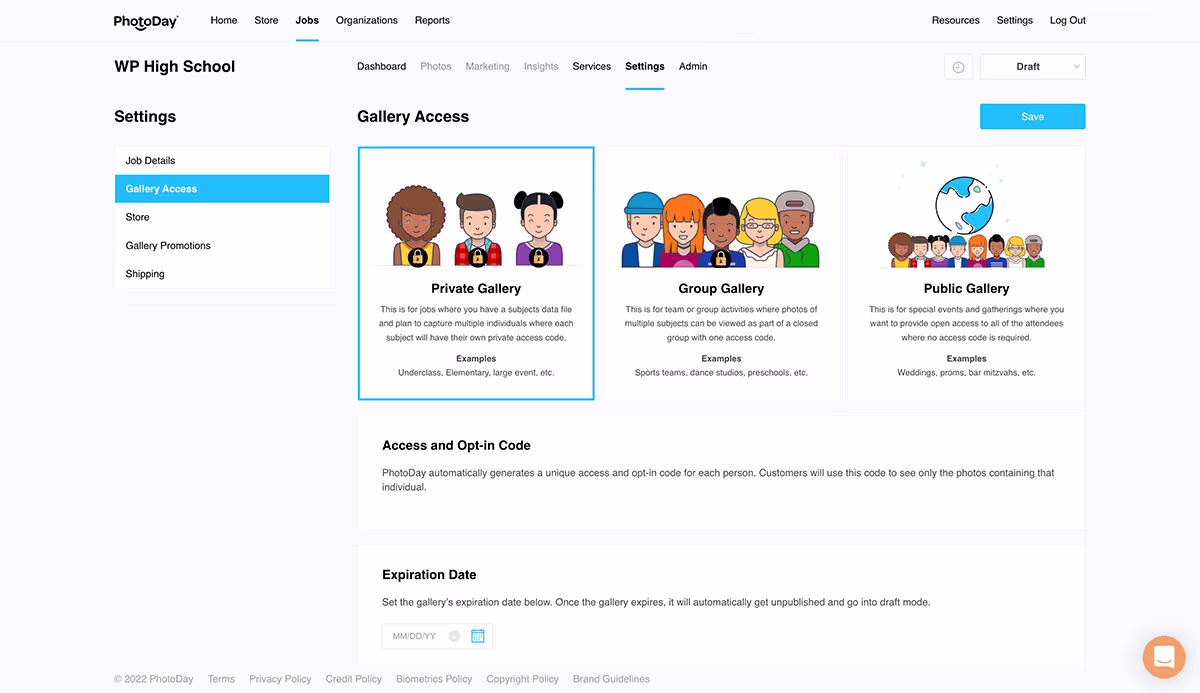
For private galleries, PhotoDay automatically generates a unique access and opt-in code for each person. Customers will use this code to see only the photos containing that individual. You can also set an expiration date for the gallery. Go back to the start of this section to read more about gallery statuses.
Group Gallery:
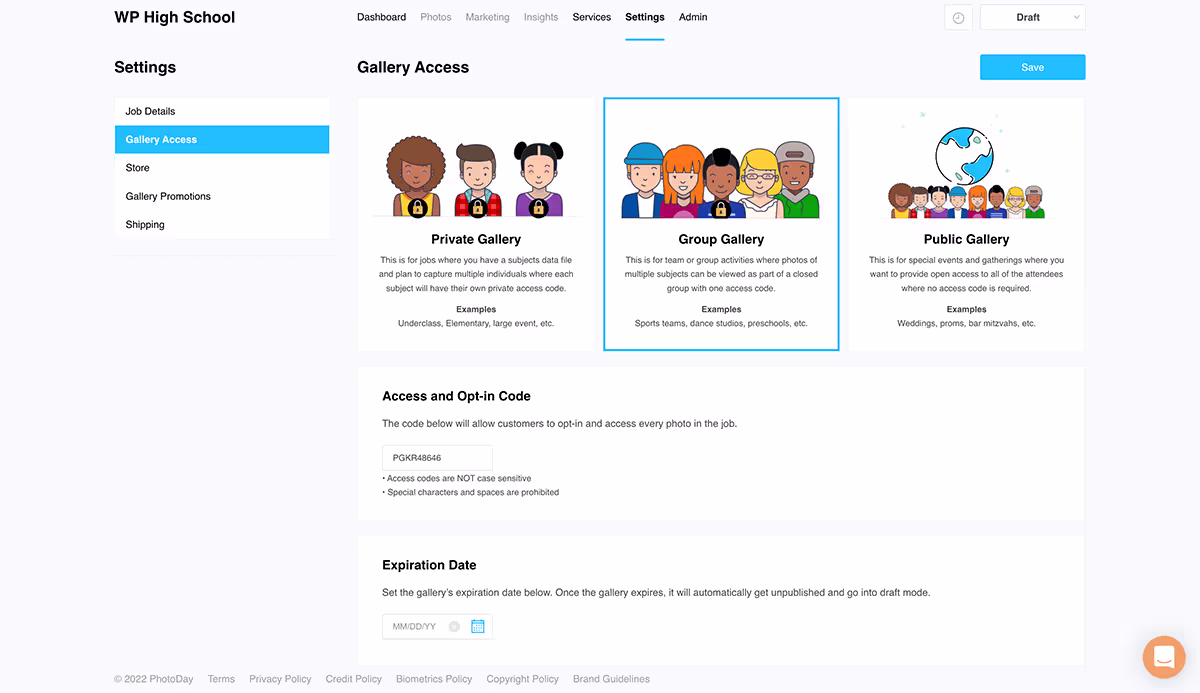
For group galleries, PhotoDay auto-generates an alphanumeric access code, however you can change it to a custom code as long as it’s ≤ 10 characters and has not already been used by another studio.
Your expiration date for the gallery can also be set here, just as with private galleries.
Public Gallery:
For public galleries, PhotoDay auto-generates a gallery link that you can share with your customers so they can view their photos.
Since public galleries do not require an access code to view the photos, there is an optional subscribe code that customers can text to 90738 to receive a direct link to the gallery (as well as other gallery communications). By default, PhotoDay auto-generates an alphanumeric code, however this can be changed to anything, as long as it’s ≤ 10 characters and has not already been used by another studio.
The subscribe code can also be used as an access code to view the gallery if customers go to galleries.photoday.io instead of clicking the direct link.
Your expiration date for the gallery can also be set here, just as with group and private galleries.
Determining what kind of gallery is best for your picture day is up to you, but once you have decided on one, go ahead and click the blue Save button.
After you have saved your gallery access settings, you will now be able to select the next step in the set-up process.
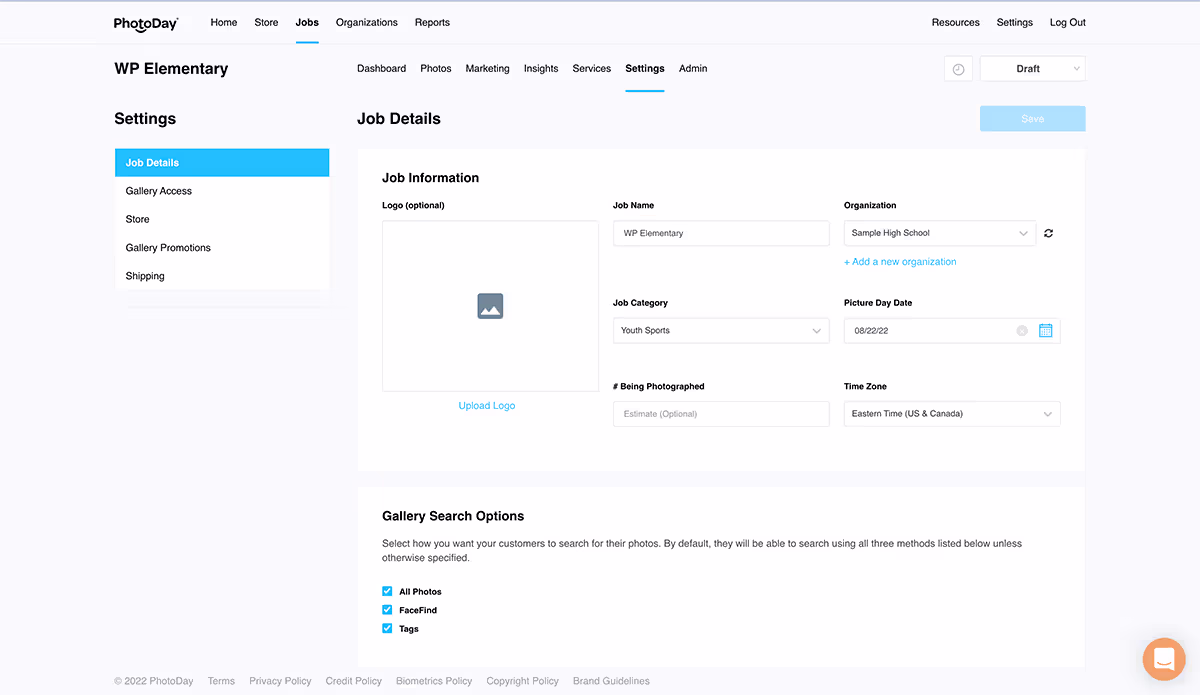
Job Details
The first section of Job > Settings is the Job Details section. Here you can edit the initial information you entered when first adding your job.
Jobs set to Group or Public Access will also have the Gallery Search Options section below the Job Information section. Here you can select how you want your customers to search for their photos.
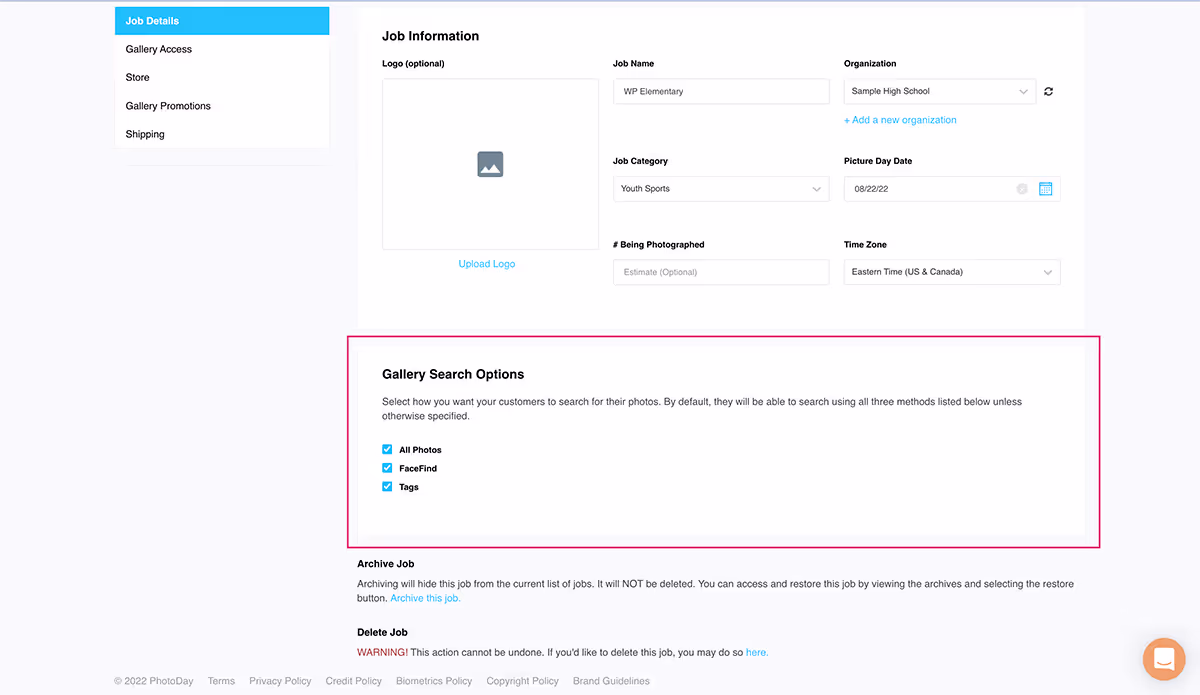
By default, they will be able to search using all three methods listed below unless otherwise specified. You have the freedom to choose any combination of these search options to use for a particular job. Here’s how it looks in the customer-facing gallery:
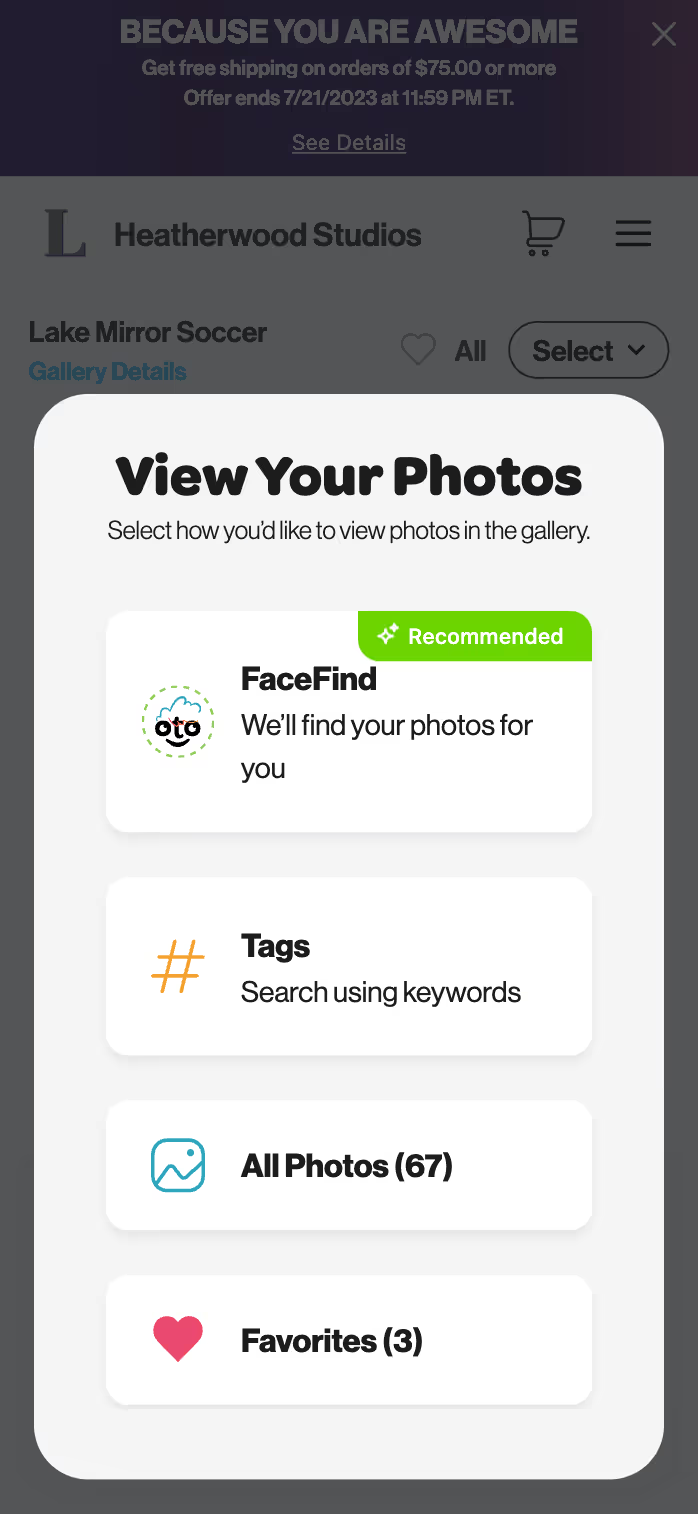
All Photos:
This view is for customers who want to browse all of the photos in an entire gallery. This is great for smaller jobs and private events where individuals know one another and want to check out all of the photos.
FaceFind:
Our facial clustering technology filters the gallery photos by matching them to a reference image uploaded by the customer and displays any photos containing the subject’s face. This option is great for large jobs or any job where more privacy is a priority. Learn more about FaceFind.
Tags:
Tags are a way to group and organize photos that are intuitive and easily searchable for the customer. Customers will be able to narrow their search based on grouping criteria set by the photographer (for example: team name, coach name, age group, etc.). Tags are great for leagues with multiple teams, dance schools with multiple classes, preschools with multiple teachers, etc. You’ll learn more about tags in this section.
We recommend having at least two search options selected.
Set Up Job Storefront
Now it’s time to set up your job’s storefront. Back on your job’s dashboard page, click the Set Up button under the Set Up Storefront icon.

This brings you to the Job > Settings > Store page. Here you can attach your price sheets, offers, and AdvancePay options, as well as any theming options for special products.
The first section displayed is the AdvancePay section.
This is where you can add an AdvancePay credit sheet and/or offer. Head to the AdvancePay section for more information.
Next is the Products section.

Here you can select the price sheet you wish to attach to your new job. Select one from the drop-down menu or click create a new price sheet.
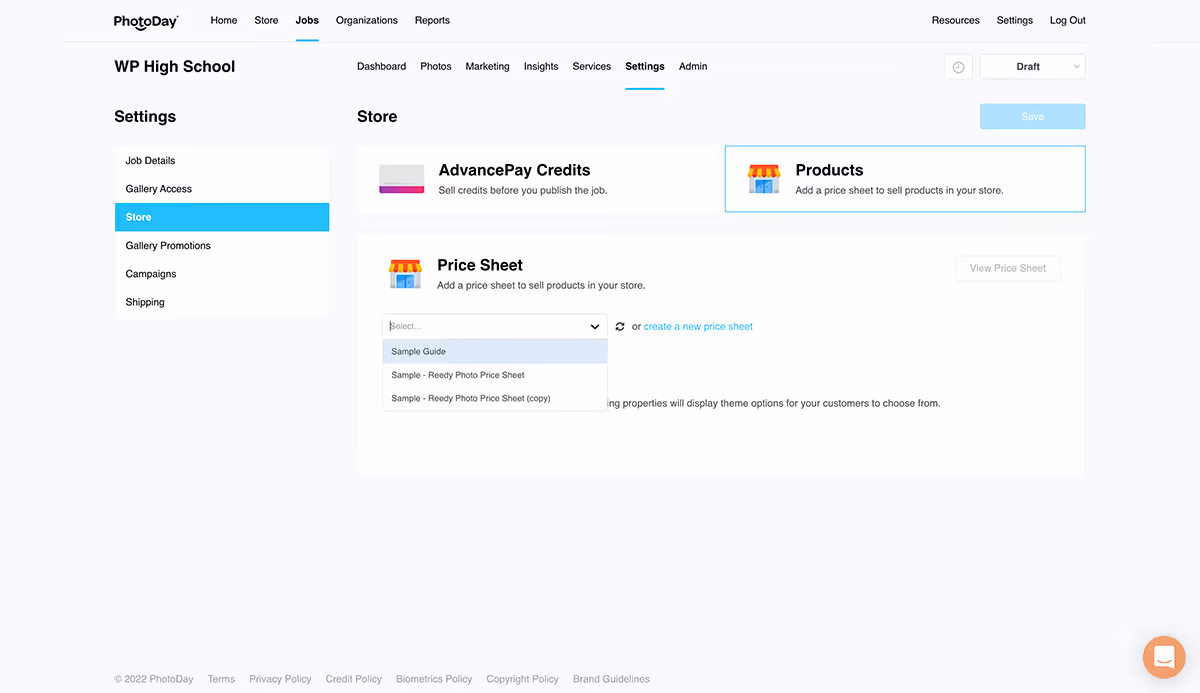
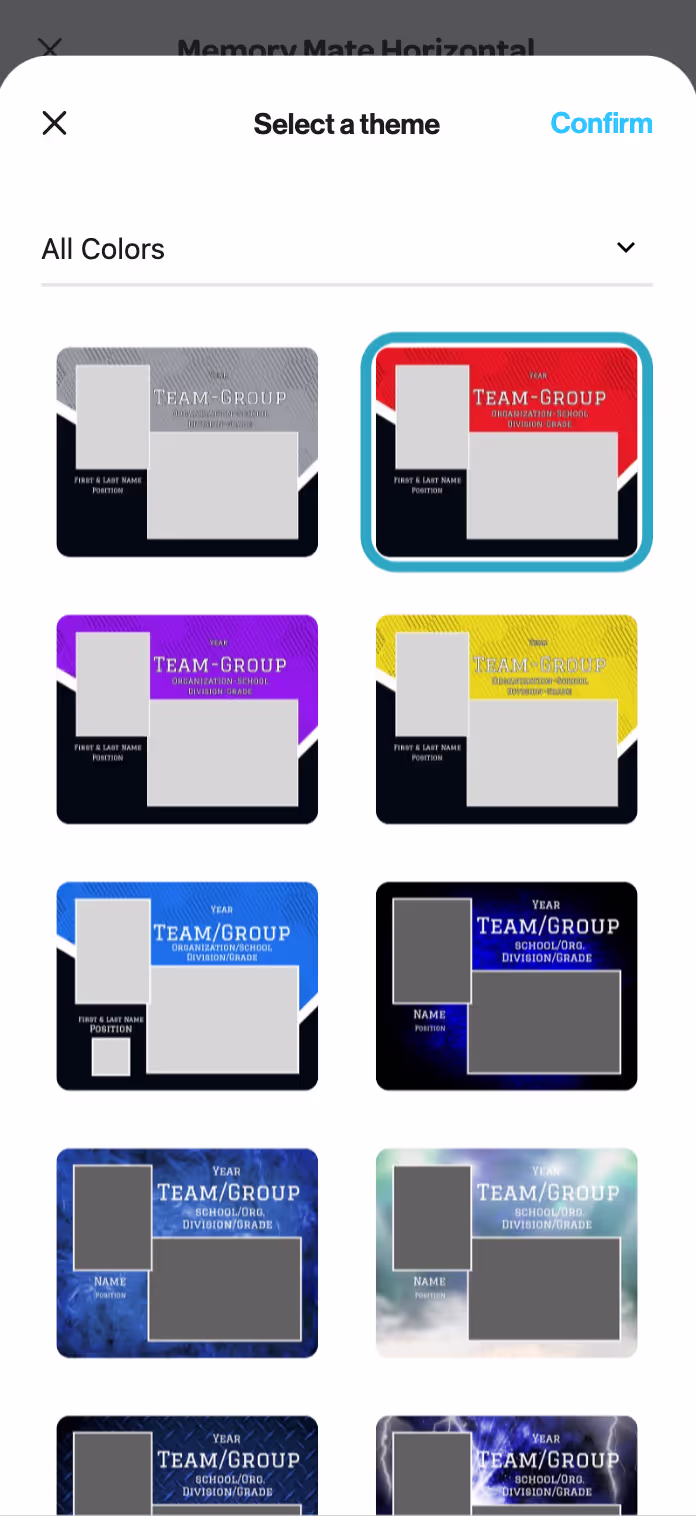
Once your price sheet is attached, that lab’s theming options will populate below. Choose which themes apply to this job—you can choose more than one! This determines specialty product theming options for your customers during checkout. You must choose at least one theme, but if you don’t have any applicable specialty products added to a price list, no themes will be presented to your customers.
Here's an example of what themes can look like at customer checkout:
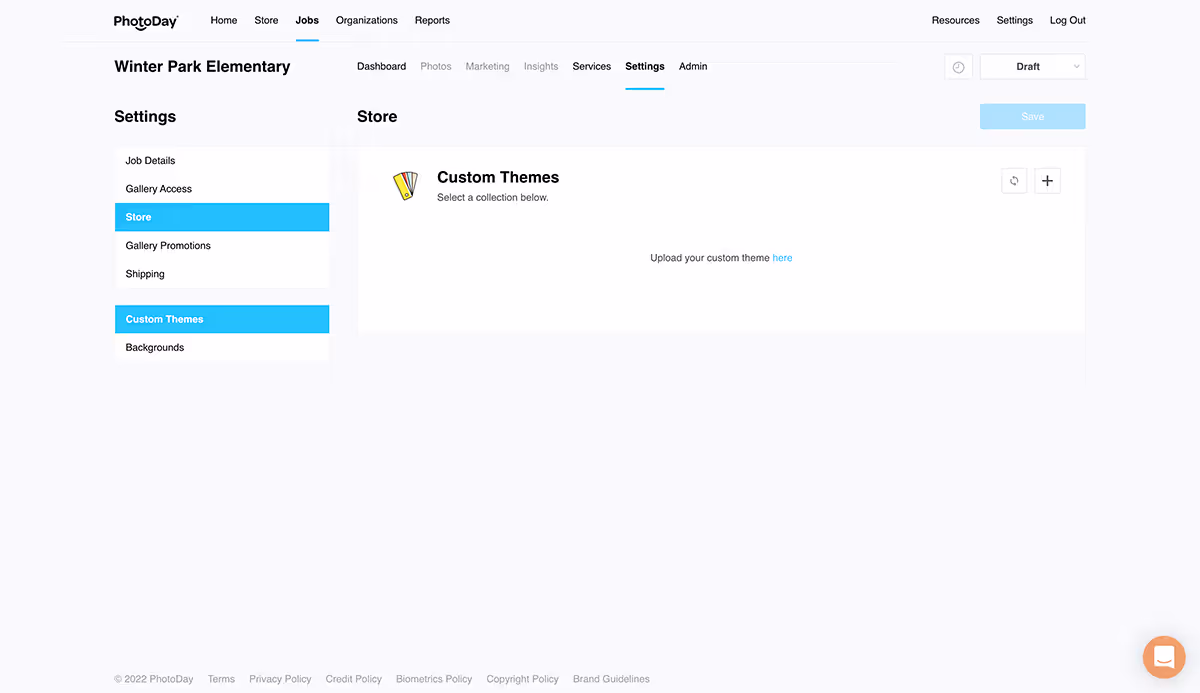
PhotoDay also allows you to upload your own custom themes. Please note that custom themes can only be used with certain labs and particular products. For a complete up-to-date list of labs and products that support custom themes, please visit this article.
Jump to the Custom Themes section of this guide for step-by-step instructions on creating, uploading, and selecting custom themes.
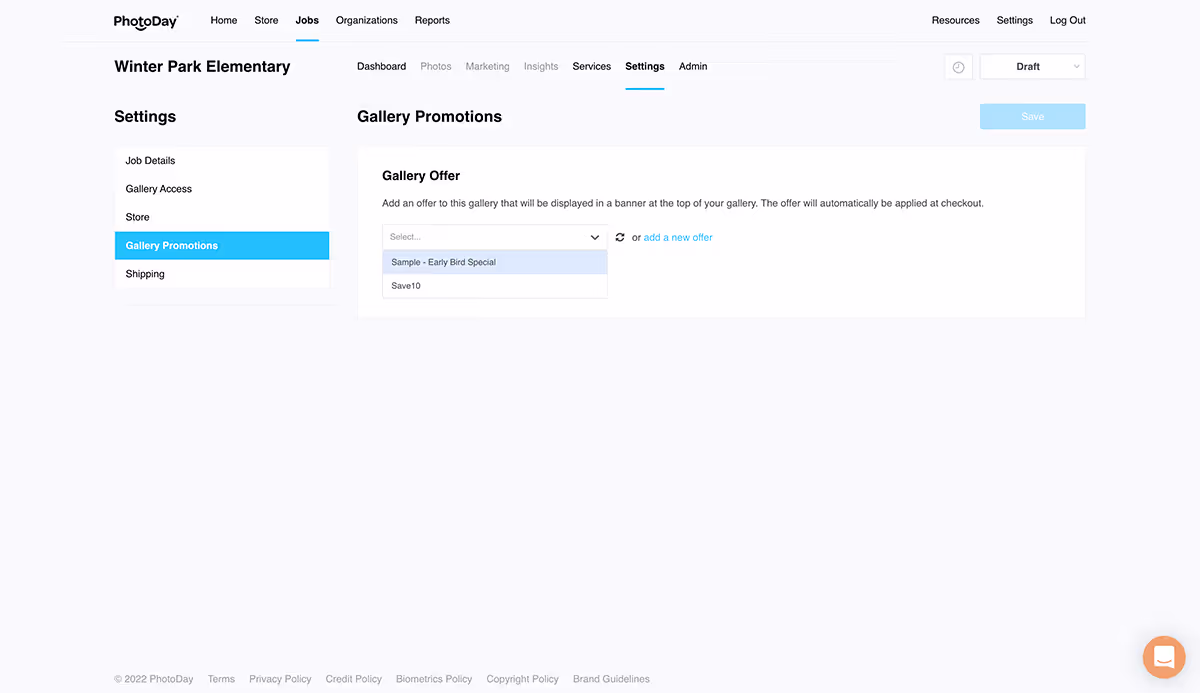
The next section is Gallery Promotions.
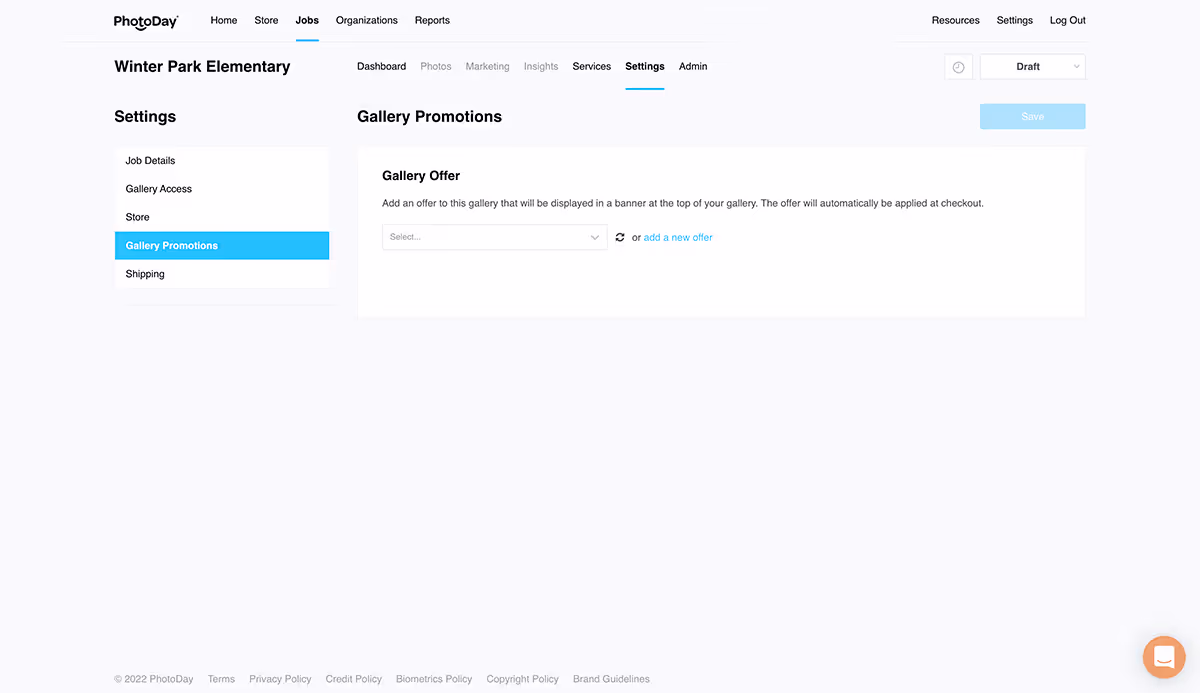
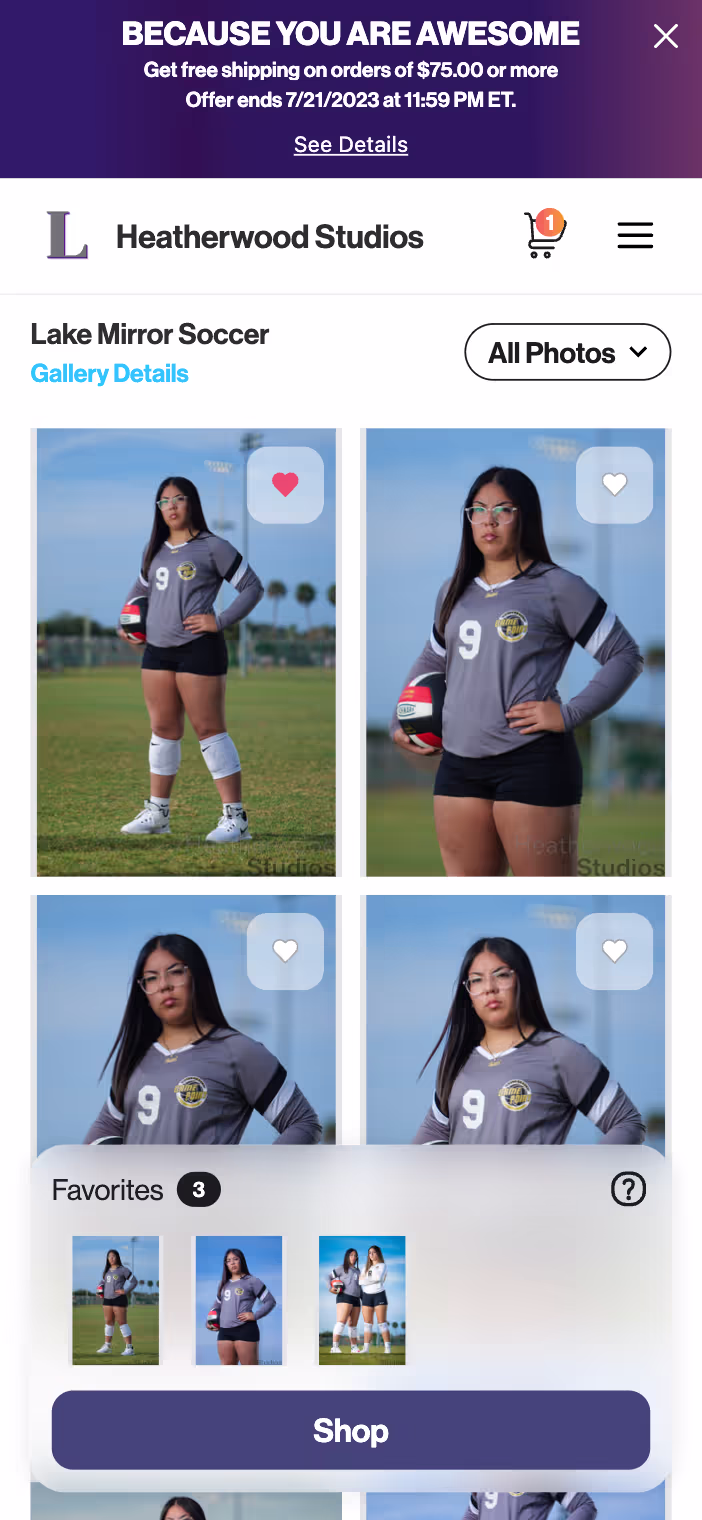
This is where you can set up a Gallery Offer (Jump to Creating Offers section). When you add a gallery offer to a published gallery, a banner will display at the top of the gallery as customers are shopping. The offer code will be included in SMS campaigns. If your offer has a minimum order rule, PhotoDay will prompt your customer to add more to their cart to redeem the offer!
Just select an offer from the drop-down menu or click add a new offer.
Here’s how it looks in a customer-facing gallery.
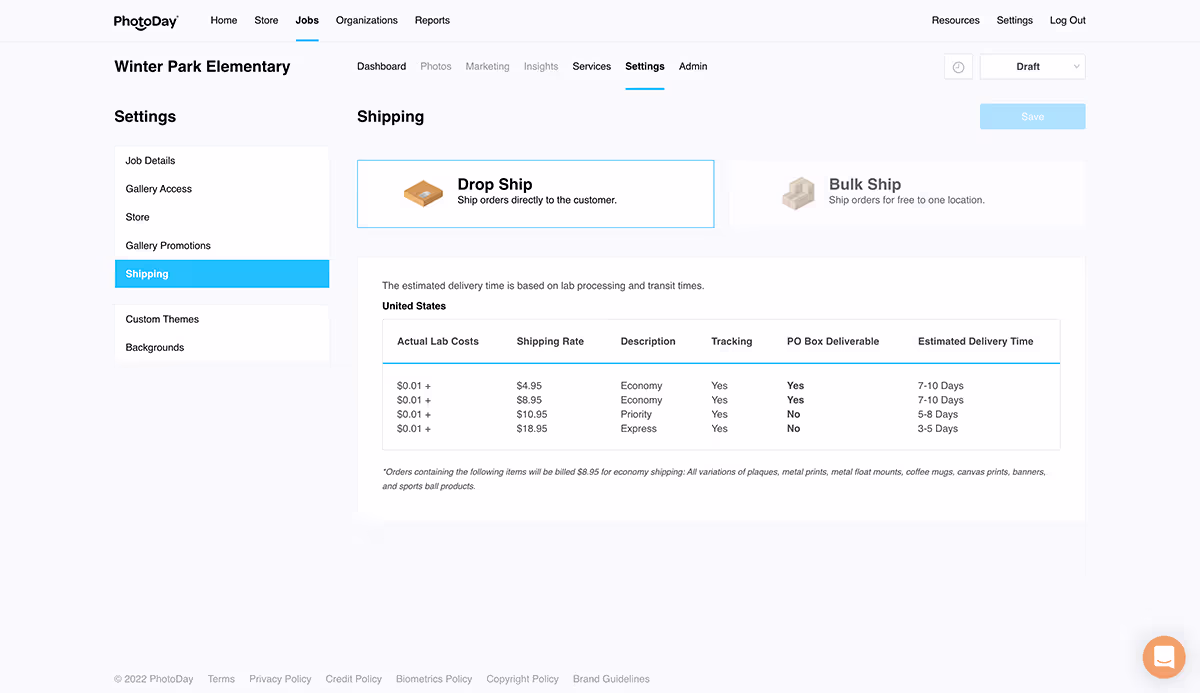
The final section is Shipping. If the attached price sheet is for drop and bulk shipping, you will be able to toggle between the two tabs.
If the attached price sheet is for drop shipping, you will see the lab shipping rates under the Drop Ship tab.
If the attached price sheet is for bulk shipping, you will see the Bulk Ship tab. Here you can see the lab shipping information, as well as enter the necessary bulk shipping details.
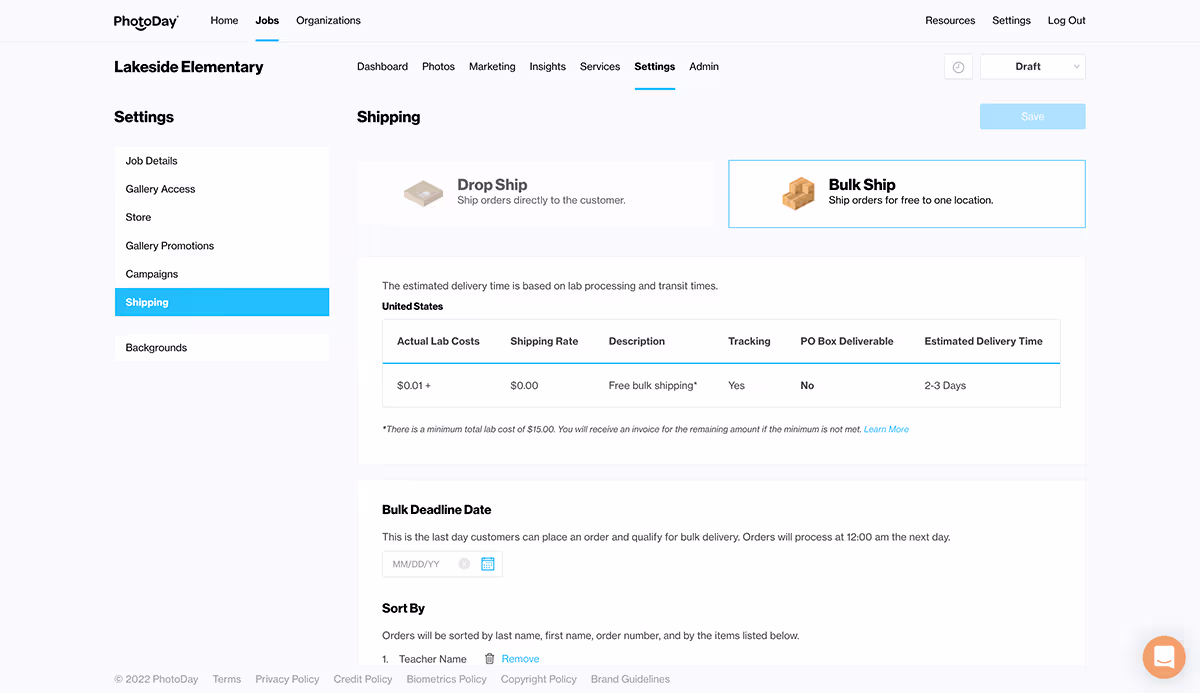
The Deadline Date is the date the bulk order will be shipped to the location specified.
Under Delivery Information, you can select an organization from the drop-down menu, which will auto-populate the address form data. You can select “Other” from the menu as well if the delivery address differs from your specified organization data. This address is not displayed to the customer at checkout.
Finally, under Delivery Note, you can include any information you wish to display to the customer in their shopping cart at checkout. This may include pickup instructions from the organization, relevant dates, or anything else you’d like to communicate about this bulk order.
Gallery Statuses
The status of your gallery dictates how it’s visible to you and your customers. Let’s go over the six possible states in which your gallery can exist and how they affect the customer experience.
Draft:
When you first create a gallery, it exists in Draft status by default. This means your customers will not be able to purchase AdvancePay credits or see photos or products. However, they will still be able to text the access code to PhotoDay's shortcode (90738) to subscribe to future updates regarding their photos.
AdvancePay:
If you create and attach an AdvancePay credit sheet to your gallery, you can then set your gallery status to AdvancePay. This allows your customers to start purchasing AP credits when they text the access code to 90738 or enter the access code via the web. Doing so will also subscribe them to text notifications. Any customers who subscribed to the gallery when it was in Draft mode will receive a text message letting them know they can now purchase AdvancePay credits. Learn more about setting up AdvancePay.
Published:
When you have your photos uploaded and ready to show the world, you can publish your gallery by switching your gallery status to Published. This will make your gallery visible to your customers.
As soon as you publish a job, PhotoDay will kick off a series of text messages to customers who have subscribed to the gallery. These messages are sent in a carefully crafted sequence and are designed to keep your customers engaged and excited to order photo products. The moment you hit publish, the first text goes out, and the series cannot be re-started.
Publish Later:
If you’d like to schedule your job to automatically publish at a specific time (which is especially great for those late-night uploading sessions), this is the status for you. By selecting the Publish Later option, you can select the day and time you’d like the gallery to publish. The time will automatically correspond to the job's selected time zone.
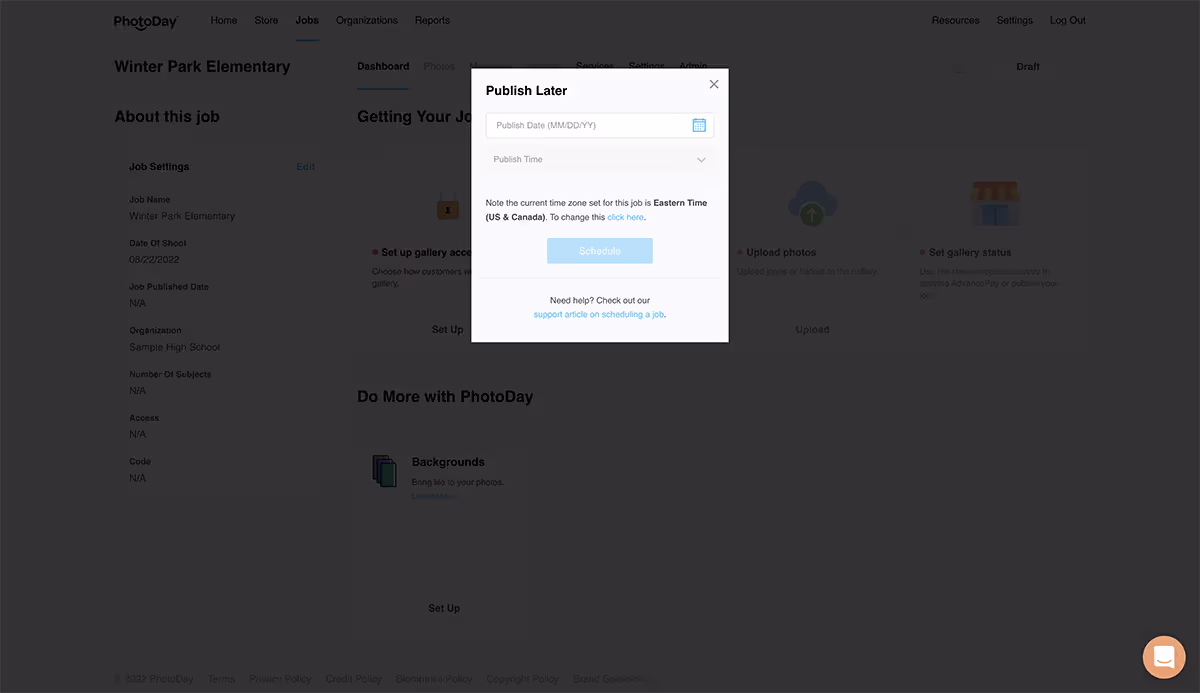
Once the time and date have been selected, press the Schedule button to confirm. On the specified date, the gallery will automatically publish and begin sending the auto-SMS series to your subscribed customers.
Archived:
Archiving a job allows you to remove it from your current list of jobs without deleting it from your account. It can be restored at any time from the Archived section of your studio panel (we’ll show you how in the next section). This is especially useful if you create test jobs, have to cancel a shoot, etc.
There are two ways to archive a job.
1. From the main Jobs page, click the archive icon:
2. From the specific Job > Settings > Job Details > Archive > Save:
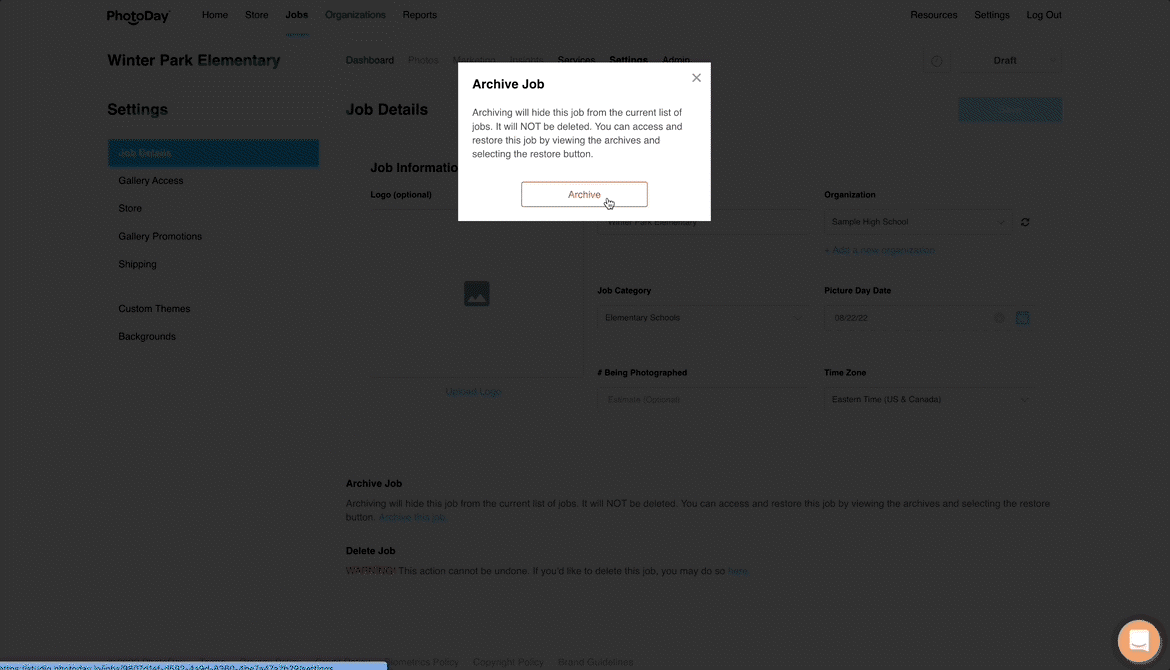
To restore an archived job, go to Jobs > Archived and click the restore icon:
Expired:
Once a gallery expires, it will automatically get unpublished and go into draft mode. Customers will no longer be able to view the gallery and will be directed to contact the studio if they attempt to view it.
You can set an expiration date for your gallery by opening the Job > Settings > Gallery Access > Expiration Date
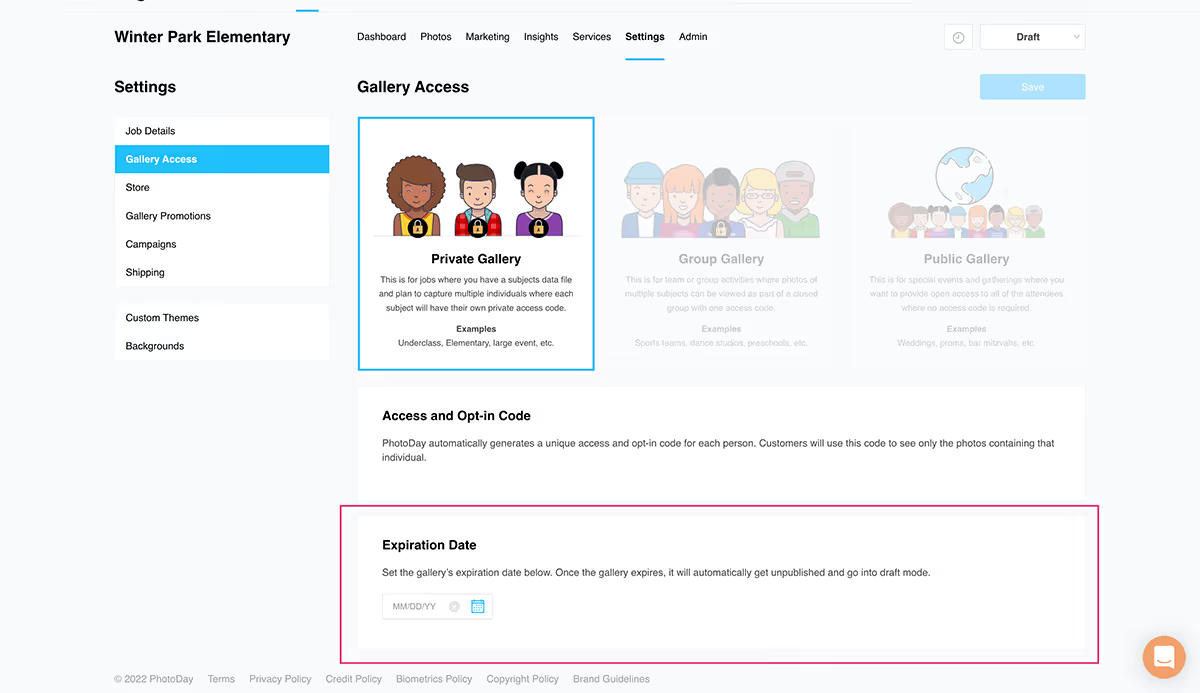
After a gallery has expired, if you want to publish it again, you can select Publish Now from the original drop-down menu (don’t worry, this won’t restart the automatic SMS series).