


Latest articles
Your guide to the PhotoDay world. Tips, tricks, industry news, and more can all be found right here.

An Inside Look at Lauryn Moore's Preschool Photography Playbook
Preschools can be one of the most consistent and scalable markets in volume photography…if you know how to do it right! Between nap times and toddlers who've never met a camera before, preschool picture day doesn't leave much room for organizational chaos.
Lauryn Moore has built her entire business, Snap Happy Preschool Photography, around earning trust with her organizations, parents, and subjects. Originally a portrait photographer for over eleven years, she branched into preschools in 2022. In just four years, Lauryn grew from just four to around 45 schools a semester—so she's got a system worth borrowing.
PhotoDay was honored to host a webinar with Lauryn, where she shared everything from how she lands new schools to how to run smooth picture days, increase parent satisfaction, and maximize sales. Keep reading for expert tips to help you branch into and succeed in the preschool market.
A Morning that Works with Your Schedule
One of the main reasons preschool photography is such a great market to explore is because it happens at an “underutilized time of day”.
“The greatest thing about preschool photography is it's not being shot at the same time as sports. It's not being shot at the same time as weddings. It's not being shot at the same time as portraits.
If you are looking for a way to add revenue to your already existing photography business, you aren't going to find somewhere better than preschool photography because it just fits in such an underutilized time of day.”
— Lauryn Moore, Snap Happy Preschool Photography
Lauryn's preschool picture day mornings start around 8:00 a.m., with setup taking 15 to 20 minutes and the whole session wrapped up before lunch. After her first season, Lauryn said, “I don't ever want to do anything else. Preschools are it for me. It was fast, I could do it when my kids were in school, and then I could just sit back and literally watch the money come in.”
Each child gets only 1 to 2 minutes in front of the camera, yet the gallery still comes out feeling full of high-quality photos: four poses per child, three crops of each (horizontal, vertical, and a closer shot), plus enough playful interaction to keep the images looking natural instead of rushed.
Three Relationships, Three Different Messages
At its core, Lauryn's approach depends on trust at three levels, each with distinct expectations and needs.
Directors want ease. Minimal disruption, no parent complaints, no extra forms or money to collect, and a photographer who's in and out on schedule. Consistent communication does the heavy lifting here: reminders at 4 weeks, 2 weeks, 1 week, and the day before keep picture day on their radar without adding to their workload.
Parents want trust and clarity. They want to know who's photographing their child, how the process works, and how ordering happens without confusion. Clear, personal communication up front cuts down on follow-up emails after picture day, too.
Children need safety and fun. That means matching energy to the child. Quiet kids need a softer approach, energetic ones need play, sensitive ones need patience. Engaging props like a squeezeable chicken or a tickle stick help break the tension and produce a genuine smile instead of a forced one.
"You have to match their energy. If they are shy and quiet, you do not need to be squeaking that chicken…that's overwhelming. But if you get a kid who's coming and parkouring off of things, you better meet him where he's at, too."
Build Relationships to Win the School
Lauryn's director relationships start with a cold postcard, sent to every new preschool she finds, qualified or not. "It's the very first touch point." Next, she moves onto cold calling.
“If you are not cold calling while you are prospecting, you are leaving money on the table. You are leaving schools on the table. You have to get used to cold calling. That is how I book 95% of my schools.”
The first call doesn't need to close anything either! It's a relationship call: introduce the business, ask if picture day is already booked, find out who currently photographs the school, and get an email address and a decision-maker's name.
From there, a drip of emails, director guides, check-ins, and process reminders keeps the school engaged. A visit only makes sense once it adds real value: a magazine with pricing, examples, staff intros, and reviews for the director, and a simple flyer for the front office.
Locking In Next Season At Picture Day
Before next year's calendar fills up, Lauryn rebooks schools for the next season on picture day itself whenever possible.
"We are asking for that rebooking at the picture day we're at."
When that's not possible, a follow-up email once galleries go live works nearly as well: check in on how picture day went, ask for feedback, and mention the next season while the experience is still fresh.
A Positive Experience for Children
What Happens When a Child Won't Smile
Not every child is ready to smile on command, and Lauryn never forces it. She always keeps the interactions gentle and low-pressure. Bringing in a confident classmate first can also help boost morale and lend confidence.
When a child still needs more time, she snaps a few images anyway and sends home what she calls a “cry card,” a simple way to let parents know the team tried and to invite them to "come back next season, and we'll try again."
Keeping the Line Moving
For Lauryn's workflow, pre-registration keeps the day organized and the PhotoDay Capture app clean. If a child isn't in the app, they won't be photographed until they are added (which can happen on-site with just a couple of taps). That keeps names matched correctly and the line moving without confusion.
Some schools skip pre-registration and photograph everyone instead. Either approach can work, as long as the workflow stays tight enough to finish on time.
Special needs awareness matters here too. When schools share information about sensitivities or exceptionalities in advance, the team can prepare quieter approaches, use assistants more effectively, and keep the interaction more respectful.
Babies get a simpler setup built around what they can actually do at that stage. Older preschoolers can follow prompts and play with props, which opens up more variety and more genuine smiles. Remember, the bigger your digital inventory, the more parents can order!
Pricing That Turns “Just Browsing” Into Bigger Orders
Lauryn keeps her price list simple and consistent across every season, so parents always know what to expect. Her structure gives families an accessible way in at every budget level: a low-cost digital option, affordable individual prints, and a full-gallery bundle.
That bundle carries two prices: a limited-time discounted rate available only in the first two days after a gallery goes live, and a standard rate after that window closes. The lower entry points make it easy for any family to buy something, while bundle pricing nudges more families toward the bigger purchase.
Expert Strategies for Your Gallery
Why the First 48 Hours Decide the Season
Right when galleries go live, orders start streaming in. Lauryn closely tracks the first few days to ensure parents are taking advantage of early incentives.
"Those first two days are so mission critical."
She offers a discounted bundle price for the first 48 hours to create urgency, which typically accounts for the largest share of orders throughout the season.
Rethinking How Long a Gallery Stays Open
Instead of expiring galleries after a few weeks, Lauryn keeps them open until the end of the season, which cuts down on notification fatigue. March and May galleries can expire together at the end of June, fall galleries near the end of that season, and Christmas galleries on their own timeline. Fewer, better-timed reminders are more effective than constant notifications.
Why Christmas Becomes the Biggest Gallery of the Year
Families want holiday images ready before their own plans get busy, which makes Christmas one of Lauryn's strongest seasons. Pre-registration, a tight shooting calendar, and careful scheduling to avoid overlap with fall all contribute to her success.
Fun, themed sets that look different from season to season keep families interested, rather than feeling like they're seeing the same gallery twice.
After the Gallery Goes Live
Communication doesn't stop once a gallery launches. Families stay engaged with texts, flyers, school reminders, digital ordering, and a limited-time bundle deal. While many parents order the moment they see the images, families who wait usually just need a gentle nudge to let them know their photos are waiting for them.
The Real Lesson: Consistency From Day One
Set pricing clearly from the start. Decide whether sibling galleries combine. Choose a pre-registration approach and a gallery expiration model, and build the director and parent experience early.
Lauryn built her business on this idea: families learn how a business operates over time, and consistency turns a single good season into a repeatable one. Watch the webinar replay to learn more tips and tricks!
Lauryn Moore's preschool photography playbook treats speed, trust, and pricing as a single interconnected system rather than three separate problems. Directors need ease, parents want clarity, and children need a calm, playful experience—and all three shape how smoothly picture day runs and how well the gallery sells afterward.
Thankfully, none of this depends on luck! It depends on building the same reliable experience, season after season. You can learn how to do it firsthand from Lauryn with her membership-style education hub, Preschool Photo Academy.
She’s also teaching at PhotoDay Creates this December and leading a live demo with real children. Lauryn says, “The fun thing about that is you absolutely have no idea what's gonna happen.” You’ll see how she guides the session to create high-quality photos while keeping everyone engaged.
PhotoDay Creates brings together the brightest minds in volume photography for three days of practical education, honest conversations, and meaningful connections. You'll learn from real studio owners sharing what's working today, what isn't, and the lessons they wish they'd known sooner. Save your spot today!

How to Increase Photo Sales Before, During, and After Picture Day
Most volume photography studios publish a gallery and wait. Some orders come in. Some don't. But the ones doing it well aren't just waiting after publishing—they've built a system that works before picture day even happens, keeps parents moving through a 30-day sales cycle, and gives buyers a reason to act now instead of later.
PhotoDay COO and Co-Founder Lisa Mallis walked through this proven system in a recent webinar. Here's what she covered.
Start with What You're Selling
Everything downstream depends on the images. Lisa was direct about this: "Image is everything in this online environment." When there are no customers at your event, no parents on the sideline, no one flipping through proofs in real time, the gallery is the first impression, and the inventory you've built is what either earns the sale or loses it.
That means gear matters. Lighting matters. Efficiency on picture day matters. Studios that have upgraded their photography workflow as they've moved online are creating more high-quality images, building a larger inventory to sell from.
There's no amount of post-processing that makes up for what happens in the camera. If you can get this part right, everything else gets a whole lot easier.
The Four Keys to Selling Online
The main components of this strategy are connection, engagement, urgency, and incentive. These aren't abstract. Each one maps to a specific set of decisions you make before and after picture day.
Connection: Get Into the Right Communication Channel
Start 2-4 weeks before picture day. Before you worry about galleries or offers, find out how your school or league actually reaches parents.
"How do you communicate important information to parents?" Because that's the funnel that you want to be in first.
Ask your contact which channels they use: text apps, email, social media, printed flyers, bulletin boards. Then get into all of them. One email rarely creates enough awareness, some parents only read texts, and others only respond to printed materials—you need multiple touchpoints in multiple places.
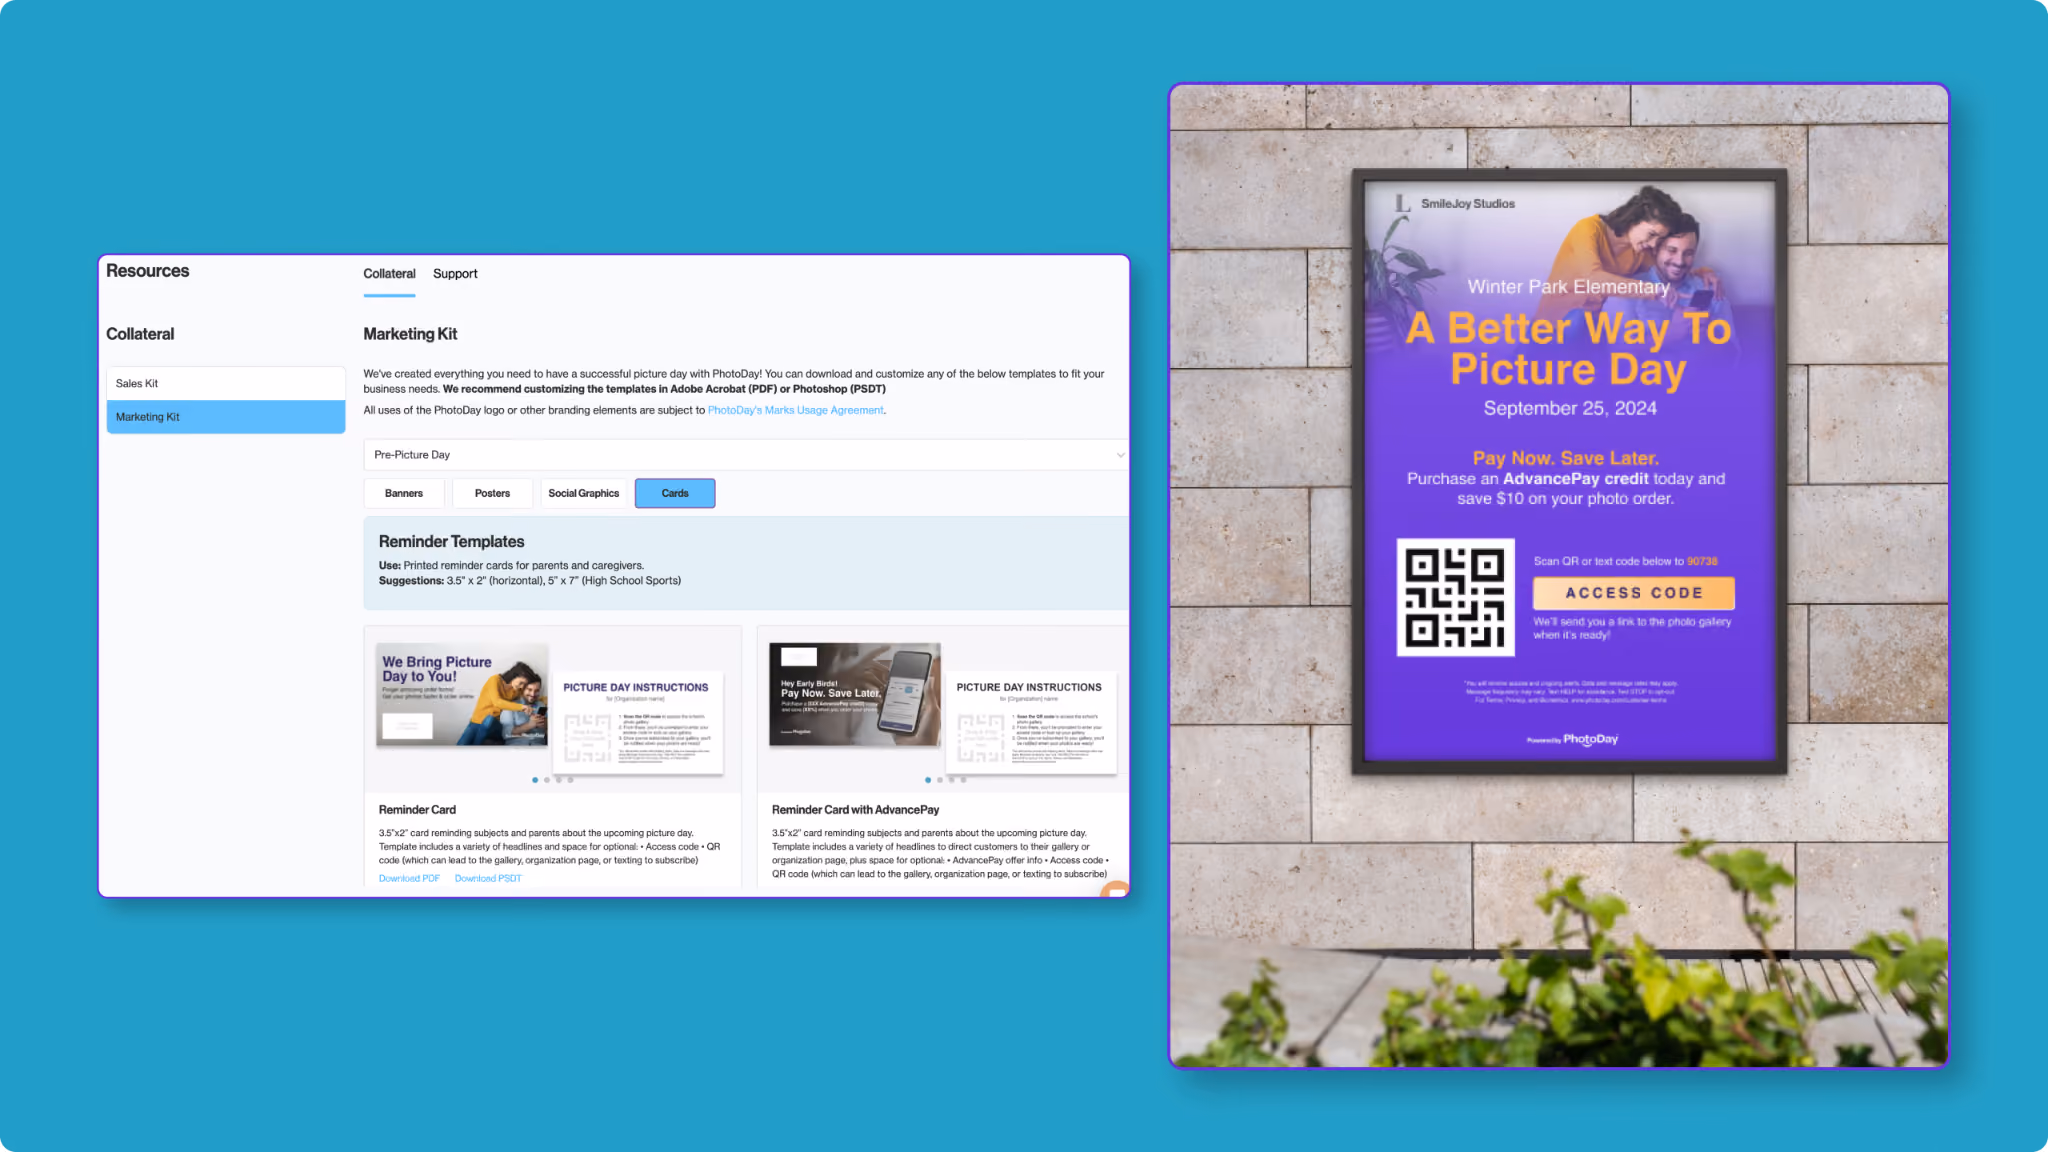
PhotoDay's marketing kit includes customizable templates for flyers, posters, signs, reminder cards, and social graphics, all ready for your branding. Plus, you can use Marketing QR codes (which can now be generated directly inside the platform) linked to a gallery URL or an SMS opt-in, without any third-party tool.
Those opt-ins are key! Think of them the way you thought about paper forms: "Replace paper forms with opt-ins. That's your paper form, because once they're opted in, you have a higher chance to convert. If they never know about the gallery and they're not opted in, you have zero chance of selling to that person."
Engagement: Text Converts. Use It.
Once someone is opted in, the trick is to bring them back into the gallery until they buy. PhotoDay automates this across a 30-day cycle: gallery launch messages, reminder texts, purchase confirmations, shipping updates, etc. You don't even have to set this up per job, because it runs automatically.
"Text marketing, especially through our short code (90738), converts the most sales." Over half of a job's revenue typically lands in the first seven days after publish, with a big chunk in the first three, driven largely by those initial opt-ins and the automated texts that follow.
A note on compliance: You cannot import a list of phone numbers and blast them yourself. TCPA rules require genuine opt-in, clear disclosure of what they'll receive, and an easy opt-out path. PhotoDay's system handles the compliance framework. What goes out is transactional communication tied to the gallery, not cold outreach.
Urgency: Build a Reason to Buy Now
Without urgency, buyers will naturally wait. They may wait until the gallery expires, and that expiration notice is often the first urgency signal since publish. Lisa's advice: don't let that be your only one.
Tactics that work:
- Gallery promotions at launch (free shipping for the first 2 or 3 days)
- Limited-time price sheets, where money-saving packages are only available for the first 30 days, then the gallery goes à la carte
- Flash sales for jobs where a launch promo was missed
- Expiring galleries at 30 to 45 days; larger studios often batch expirations at the end of each season
- Fundraiser deadlines, where the org's commission only applies to orders placed before a specific date
Pick your model and stick with it. When you repeat the same pattern across every job, customers learn what to expect. Early buyers always get your best price. PhotoDay gives you the tools to run it seamlessly every time.
Incentive: Tell Them What to Spend
Incentives aren't discounts. Lisa says, "I don't ever want you to think of this as discounting your products and services. You're giving them an incentive to purchase and purchase more."
The goal is to motivate the behavior you want, and spend thresholds work well; set a minimum order amount and offer a percentage off or a dollar amount back. The classic retail mechanic applies: when someone sees they're $5 away from getting free shipping, they add something to the cart.
A few offer ideas to try:
- An AdvancePay credit offer that beats the gallery promo, rewarding early buyers more than those who come in later
- Save 10% on orders over a set threshold
- $20 off orders of $200 or more
- Free shipping to the first 20 buyers (a max redemption offer is good for building early momentum with new organizations)

For AdvancePay specifically, it functions as digital credit purchased before or during picture day, available in $5 increments, redeemable for anything in the storefront. Studios can attach incentives to it or simply require it as a "sitting fee" (which is especially helpful for dance, compositing-heavy jobs, or team photo work where the upfront investment is significant). "Orders that have AdvancePay applied to them are higher than orders that don't, because money spent is money forgotten."
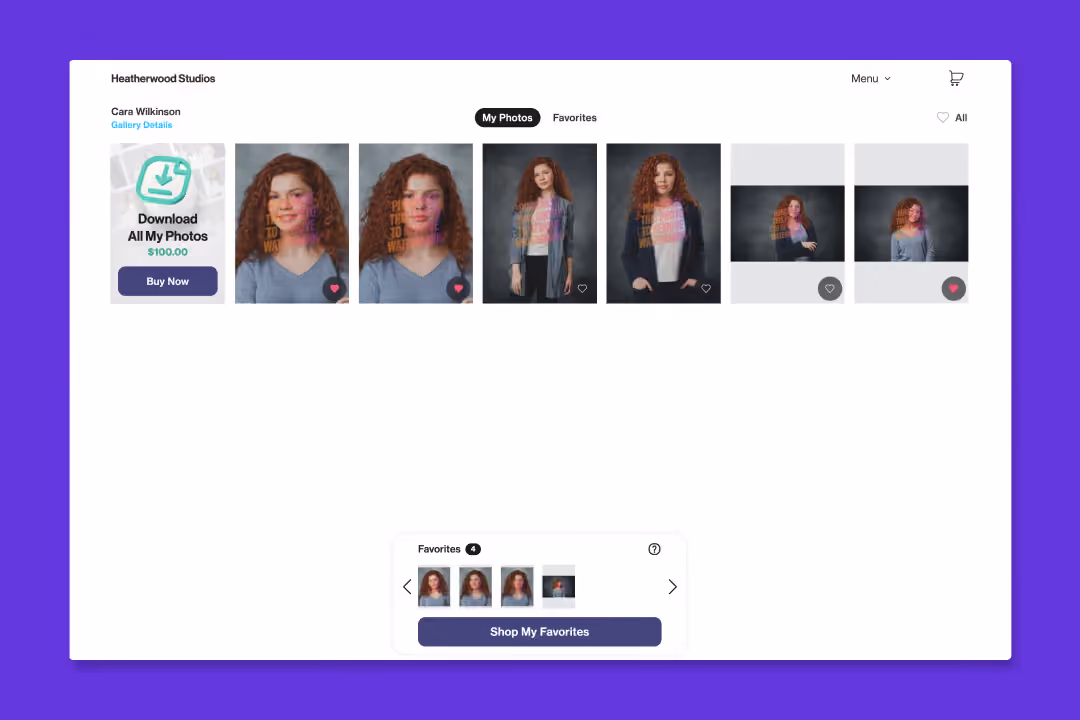
One Tool That's Changing AOV
Download All deserves its own section! This product is quick and simple thanks to FaceFind, our facial clustering technology. Unlike other platforms, you don't have to sort through QR codes or deal with manual matching headaches to offer Download All to your customers.
All you have to do is set the price for the Download All product in your price sheet, then your customers can get every photo of their child as High-Res digital downloads—instantly with just a few clicks and zero extra work on your end.
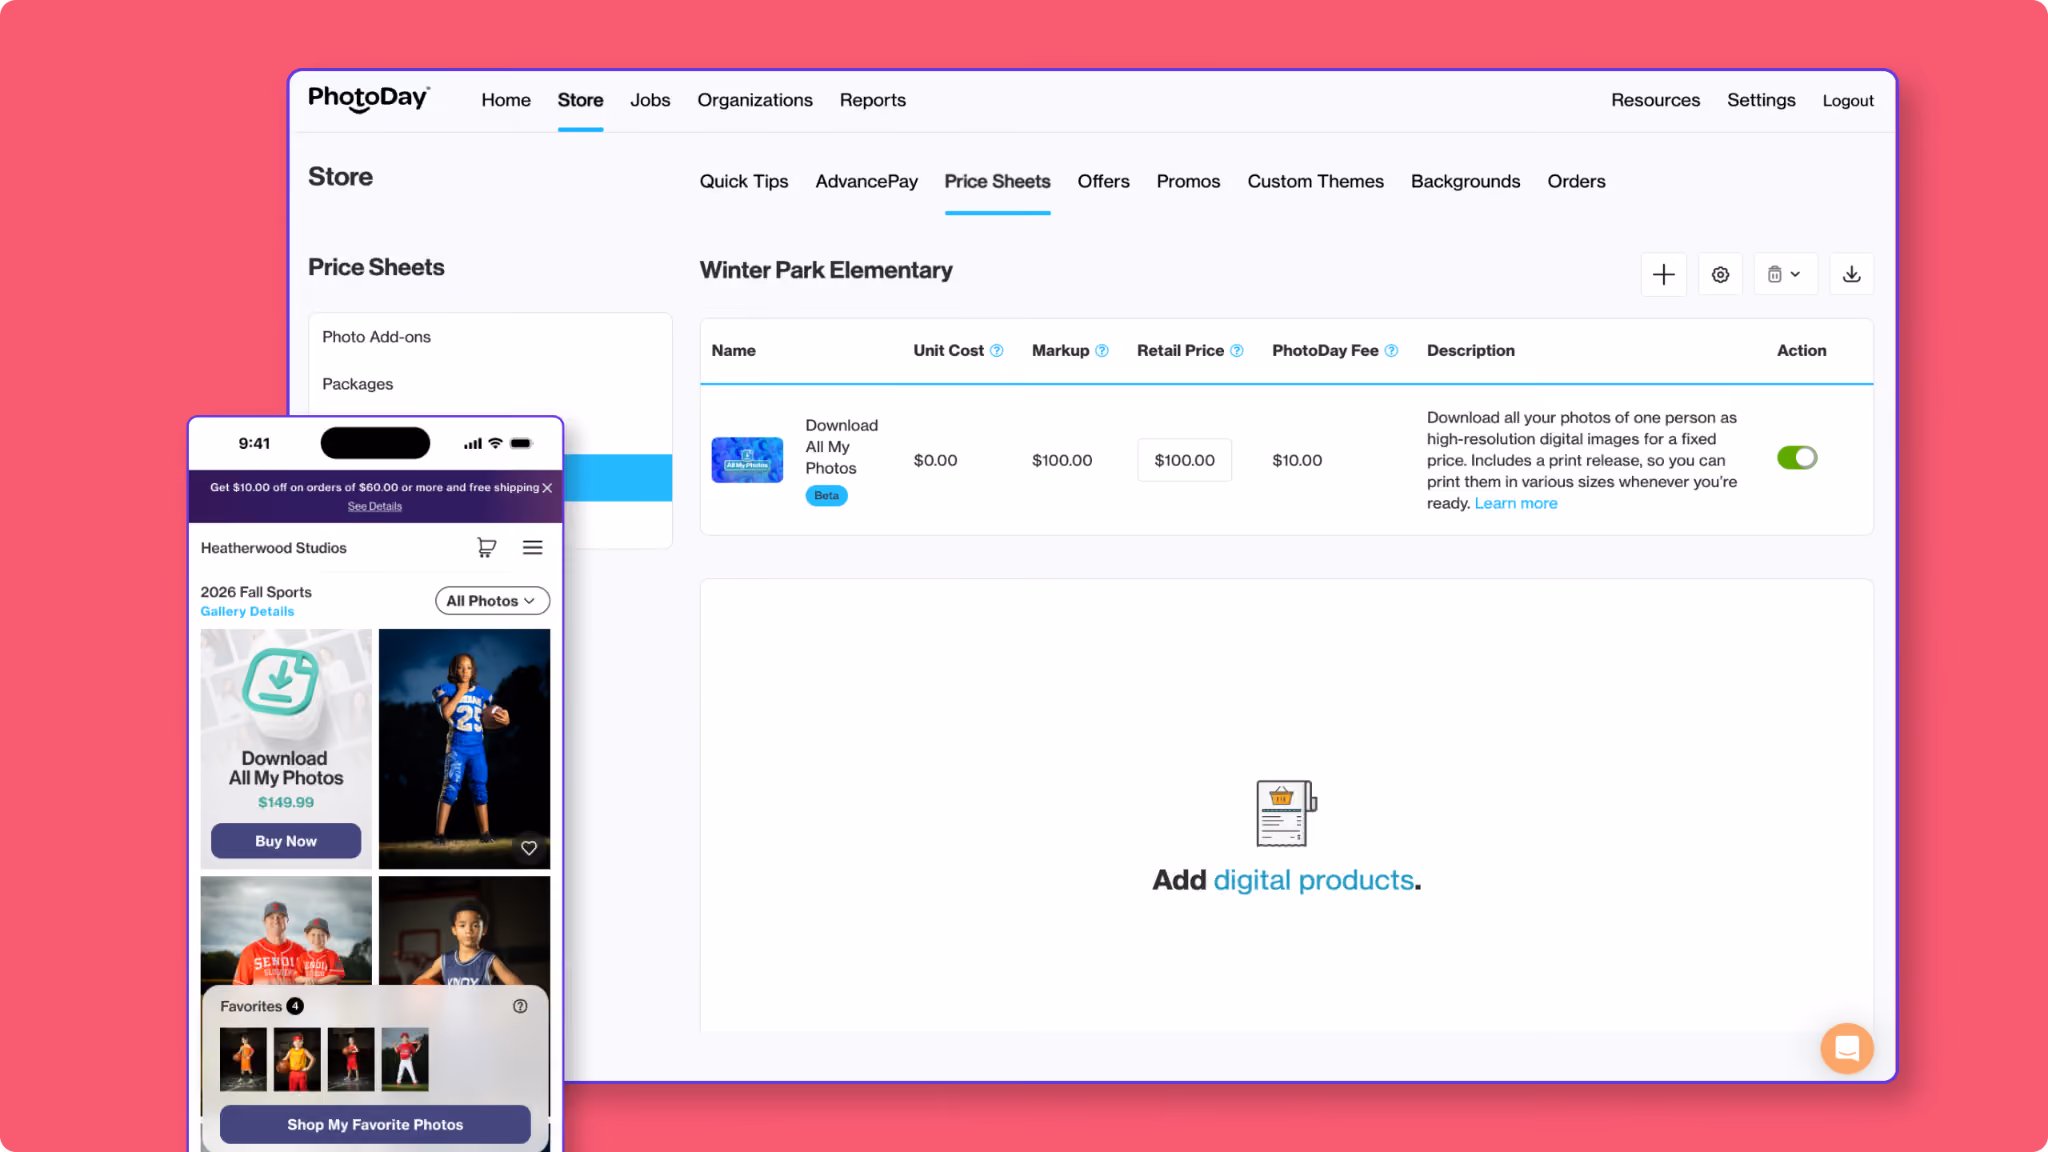
Jay and Carinna Boatwright of smaX Photography put it simply: "Download All changed the game. Parents can grab every image in just two clicks—one to find, one to buy. The results: +30% AOV and +27% revenue per subject photographed. Faster checkout, bigger orders, more money every time we press the shutter."
But don't worry! Print sales haven't declined. This digital revenue is merely additive. If you're not currently offering Download All, it's worth a close look before your next gallery publishes.
The studios generating strong online revenue aren't relying on the gallery to do the work by itself. They're getting customers to opt in before picture day, leveraging automated communication that brings buyers back throughout the sales window, building urgency into the launch, and giving customers a clear reason to spend more.
These four keys—connection, engagement, urgency, and incentive—work together to create a predictable, satisfying revenue pattern. Check out the webinar replay to learn even more!
Want to walk through how you can implement any of these tips for your next picture day? Request a demo to connect with the PhotoDay team. Want to jump right in? Create a free account to get started.

No Roster? No Problem. Run Picture Day with Public & Group Galleries
Picture day without a complete roster of subject data used to mean extra staff, check-in friction, and hours of manual sorting afterward. But PhotoDay’s Public and Group Galleries are built to solve all of that hassle while making picture day better for everyone involved.
Keep reading to learn how these versatile gallery types work and how to get the most out of them.
What Public and Group Galleries Actually Solve
Picture this: it’s a week before picture day, and you still haven’t received any subject data from the organization. We’ve all been there! When a school or league won't hand over a roster, or when it shows up incomplete two days before picture day, your entire workflow gets harder. More staff. More manual matching. More stress.
Public and group galleries bypass that entirely. Neither type requires you to assign photos to individuals in advance. You don't need to know the order you're photographing in. If a kid needs to get back in line for a redo, that's fine. Just upload the images, and FaceFind handles identification when families search in the gallery.
As Emily (Account Executive at PhotoDay) put it during a recent webinar: "This is where PhotoDay really shines. You don't need to know who you're shooting. You don't need to know the order that you're shooting in...Really think about what that can do for you."
What can it do? Let you focus on the photography side of things to capture more poses and better expressions with fewer manual tasks.
The two gallery types share that core benefit. The only difference is access:
- Group Galleries use an access code. Customize it (a league name and year works well) and share one code for the whole gallery of images.
- Public Galleries use a link and don’t require an access code. Anyone with the URL can browse the full gallery.

Tagging: How Photos Get Organized
Since you're not assigning photos to individuals, tags become your organizational layer on top of FaceFind. Think of them as folders parents can browse if they'd rather filter by team than upload a reference photo.
Three ways to apply them:
- Lightroom keywords are automatically pulled in as tags during upload.
- Folder structure does the work for you. Upload a parent folder with subfolders (Team A, Team B, Team C) and PhotoDay tags images by subfolder name.
- Drag and drop inside the platform if you prefer to tag manually.
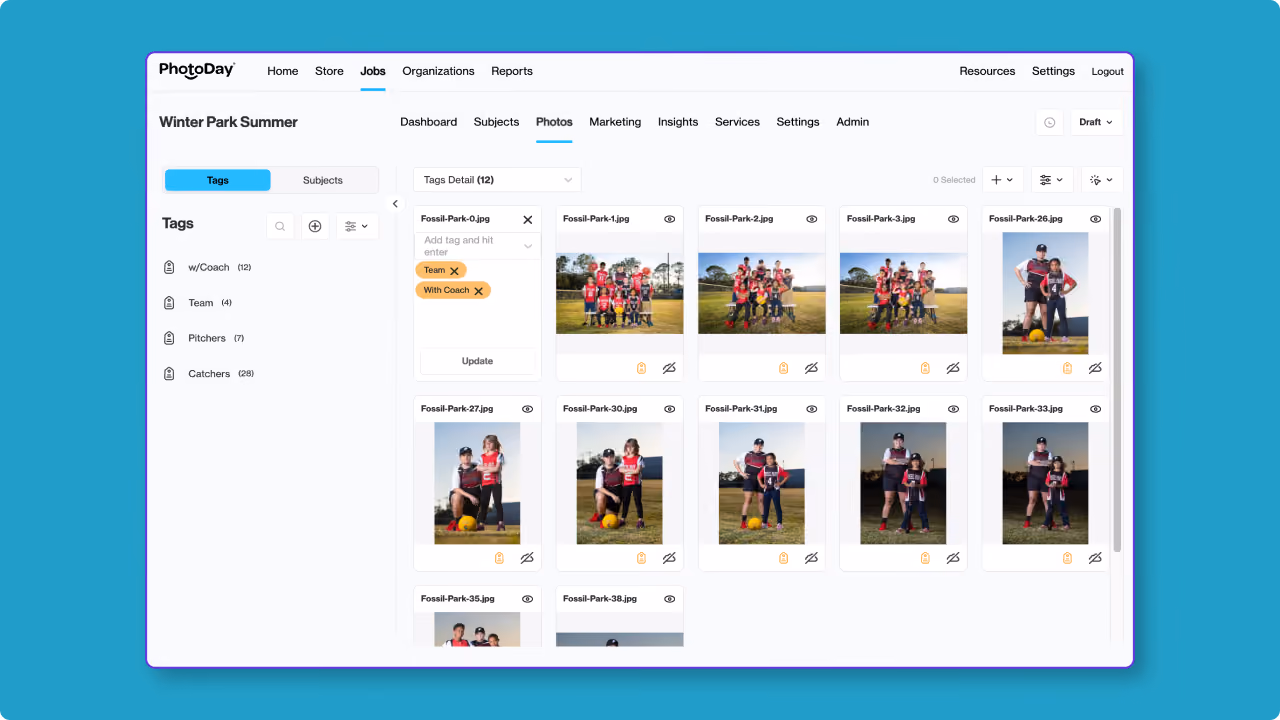
For team photos, there’s one additional setting worth knowing: You can select those images and disable digital downloads to make them print-only. That keeps team photos from being downloaded and shared before all families have had a chance to order.
What Families Experience
The customer experience is designed to create an emotional connection fast. When someone enters a group or public gallery, they're immediately prompted to use FaceFind (if enabled) to search the gallery: upload a reference photo of their child, and the gallery returns every image where that face appears. The technology handles crowds, action shots, and even large groups—if a parent can identify their kid in a photo, FaceFind can, too.
For families who'd rather not upload a photo, tag-based browsing lets them filter by team, session, or any other criteria you’ve established. And if the “All Photos” search option is enabled, they can scroll through the entire gallery, find their photos, then click "find similar" to pull up more images of that same person.
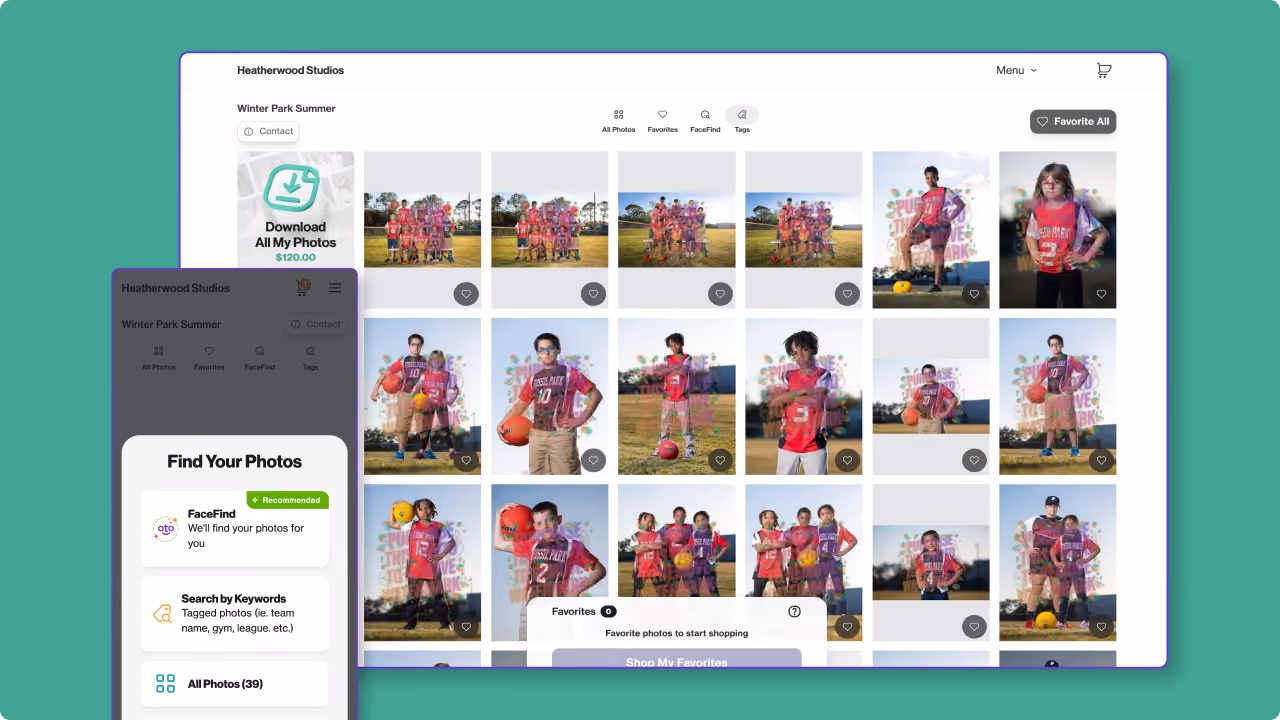
You can choose to offer all three search options, just FaceFind, or any combination that best fits the job.
The result: "high buyer conversion," as Emily described it—because families reach their child's photos quickly, and that emotional connection drives the sale.
It helps that the experience is built for the way families actually shop: Austin (Studio Activation and Growth Manager at PhotoDay) noted that about 76% of orders come through mobile devices, which is why PhotoDay's galleries are optimized to feel like an app on a phone rather than a scaled-down website.
Setting Up the Job
When you create a job, you'll move through a few steps (like job name, organization details, picture day date, etc.), including choosing the gallery access type. When you choose group or public, you'll confirm the access code or customize the public URL, set an optional expiration date, and configure your storefront.
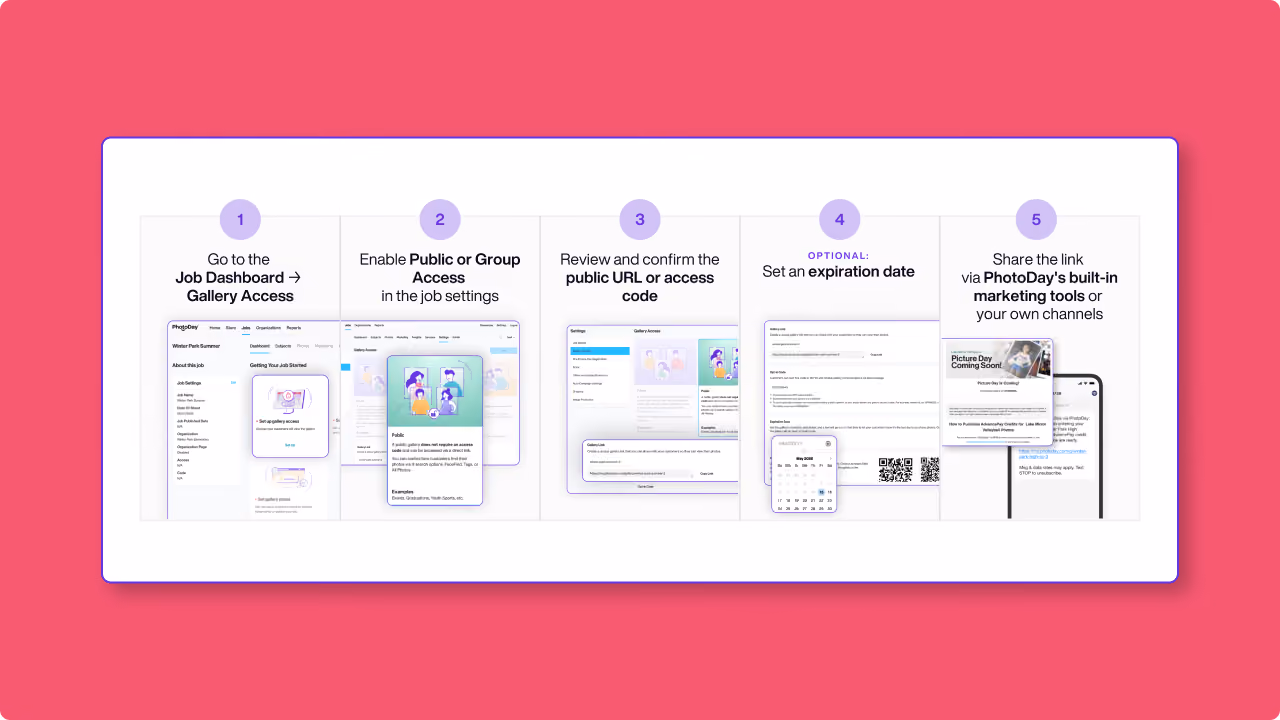
A few things worth getting right at setup:
- Expiration date: Set it at least 35 days out. PhotoDay sends automated reminders on days 1, 3, 5, 7, 14, and 30 after publishing, plus a last-chance reminder when the gallery is about to close. "Any procrastinating parents—that's when they're going to order," Austin noted. Expired galleries can be republished at any time.
- Price sheet: Keep names generic so you can reuse them across multiple sports and seasons. Job-level product themes reduce unnecessary choices with built-in design elements, speeding up the checkout experience for families.
- Image protection: Auto Blur deters screenshots on desktop, while Info Overlay places the customer's name, email, and phone number as an additional watermark to discourage unauthorized sharing. Screen Block for mobile devices is currently in development.
Use Marketing QR Codes to Get Opt-Ins
Getting families into PhotoDay’s automated marketing sequence is the most important thing you can do before and during picture day. Once someone opts in, our automated messages handle the follow-up. Your job is to make opting in as frictionless as possible.
PhotoDay recently launched two marketing QR code types built specifically for this:
- URL QR Code: Opens the gallery in the customer’s web browser and prompts them to subscribe to text notifications upon entering.
- SMS QR Code: Automatically creates an opt-in text message with the gallery’s access code to 90738. All the customer has to do is click Send to subscribe and receive a direct link immediately.
Put these on flyers, posters, marketing emails, or hand them to a league coordinator to share with their group chat. The more touchpoints you create before photos go live, the larger your opted-in audience when they do.
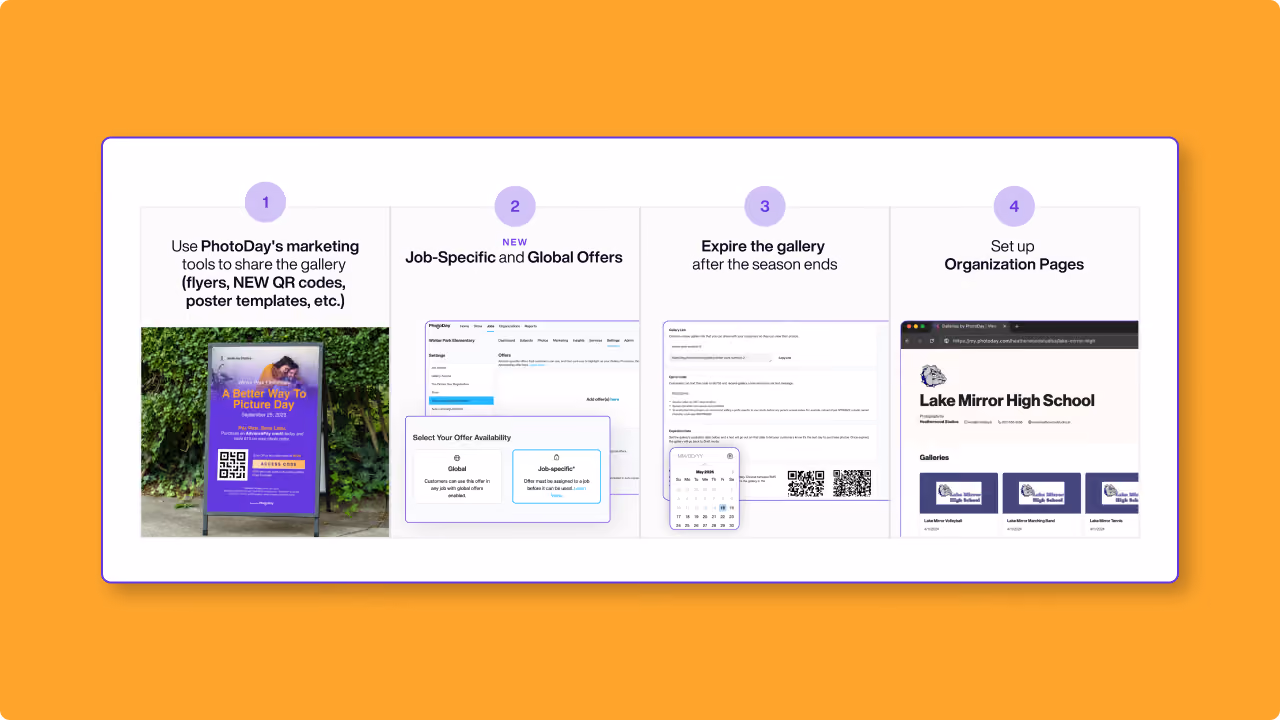
Storefront Tips: AdvancePay and Offers
AdvancePay works as a credit applied toward any order. Customers buy the credit early and use it when the gallery opens. There's no package lock-in, so if a family wants to order more than their original AdvancePay credit amount after seeing the photos, nothing stands in the way.
Attach an offer like free shipping to AdvancePay to reward early buyers. For families who didn't order early, a Gallery Promotion banner lets you run a separate incentive at a higher threshold, like free shipping on orders over $75. Tip: Always make sure your AdvancePay offer is the best deal.
Job-Specific and Global Offers give you additional flexibility. Global offers apply across all active jobs, while job-specific offers apply only to the ones they’re assigned to. Used together with AdvancePay, they give you layered incentives that can move buyers at different points in the sales window.
Keep Things Simple with Organization Pages
Organization Pages are an understated but powerful tool in PhotoDay! Use them to group multiple jobs under a single landing page with a permanent link.
The practical value: if a parent comes back to order graduation photos and happens to see last year's wrestling gallery still on the page, that's an additional sale with no extra work on your end!
"Organization Pages are one of the most underutilized tools in the PhotoDay ecosystem," Emily said during the webinar. The studios making the most of them are posting QR codes in high-traffic areas—main offices, gyms, locker room hallways—and picking up sales they otherwise would have missed entirely.
Use Subject Data When You Need It
Group and public galleries are built for jobs without rosters, but they can also work with subject data when your job requires it. If you're producing composites and need first name, last name, and jersey number for each subject, you can import a CSV through the PhotoDay Capture app and still run a group gallery with a single access code for families.
The benefit: structured subject data for backend production and simple access on the customer side. Learn more about using subject data in different gallery types.
The Short Version
Public and group galleries remove the dependency on subject data to simplify picture day—less staffing, less check-in friction, more time to focus on the photography itself. Set up the job correctly, get families opted in early, intentionally expire the gallery, and let the automated marketing handle the follow-up. The system is built to handle the rest.
If you're not already using PhotoDay, there's no upfront cost and no monthly subscription. You only pay when you sell!
Sign up to get started or watch the webinar replay for more tips and a step-by-step walkthrough.

The Digital-First Price Sheet: How to Structure It, Price It, and Let It Work
Is your price sheet leaving money on the table?
Here's a number that might surprise you: parents who buy Download All alongside prints spend 221% more than those who buy only prints.
You read that right! Two hundred and twenty-one percent more.
This impressive statistic was shared in a recent PhotoDay webinar on packages, pricing, and promotions—and it's the kind of thing that makes you want to open your price sheet and take a hard look. For many studios, digital downloads are either missing entirely or priced in a way that accidentally works against you.
Here's exactly what to fix and why it works.
Why Digital Is the Lever You're Not Pulling
Across youth sports benchmarks, the average print-only order lands around $43. Add individual downloads, and that climbs to $59. Offer Download All (Download All), and the average jumps to $109. When parents buy Download All and add prints on top, that number reaches $152.
That's not a small optimization. That's a fundamentally different business outcome from the same picture day.
Rose Coleman of Center Stage Photos photographs cheer and dance nationwide, traveling about nine months a year. 60% of her total revenue comes from Download All. 80% comes from digitals overall, and her average order value runs about 67% higher than typical platform averages.
"You can't sell what you don't show. The more images that you show, the more likely the potential of a bigger sale. I don't take shots that look just a little tilted; I want them to be totally different, so they don't have to go through the decision-making of narrowing down." — Rose Coleman (Center Stage Photos)
That's both the philosophy and the strategy. But it only works if your price sheet is set up to support it.
The Math That's Working Against You
If your individual download is priced at $25, a parent can buy four images for $100, which is less than the price of a $100+ Download All product. There's no compelling reason to upgrade. But if your individual download is $35, three images cost $105. Suddenly, Download All at $99 is the obviously better deal.
The individual download price is what makes Download All feel like a no-brainer, and the $35 minimum is almost non-negotiable.
"Someone would see $35 for one, and then they'd see $99 for all, and if you have a great variety of images, it's a no-brainer that they're going choose the Download All option." — Stevie Williams (PhotoDay)
5 Things to Fix on Your Price Sheet
First, add Download All to your sheet. It sounds simple, but 50% of studios on PhotoDay still have zero Download All sales.
"Half of our studios are not currently using Download All. The other half are experiencing upwards of 20% higher job values than the other ones. So the data does speak for itself." — Kyle Bodin (PhotoDay)
Second, price your individual downloads at $34.99, not $25.
Third, price Download All in the $89-$129 range. Studios that offer Download All at the right price consistently see up to 20% higher average job values than those that don't.
Fourth, build a top package in the $95-$105 range that includes one to three downloads. This creates the upgrade moment—a clear path to spend more, with Download All right there as the obvious next step.
Fifth, keep the gap between your top package and Download All at $15–$25. If the gap exceeds $40, the pull disappears.
When Download All Isn't the Right Fit
Not every job is a Download All job, and that's okay. When image sets vary widely by subject, digital bundles tiered pricing works well: the per-image cost decreases as quantity increases, and the cart naturally nudges parents toward the next tier.
Digital Bundles are a strong alternative for group or public galleries where FaceFind may not consistently match, such as candid shots with multiple faces in the background or partially obstructed faces. When pricing your Digital Bundles, make the per-image discount meaningful as quantity increases, not just a dollar or two cheaper, but an impactful savings jump.
Inventory Changes Everything
Download All works best when the image inventory justifies it. Rose's strategy isn't to take one pose, crop it three ways, add black and white, and call it six images. She creates multiple genuinely distinct poses, produced quickly.
The target: a minimum of three unique poses to offer Download All at all, and five to ten for best results. Buddy photos, sibling photos, and team images can all be included in the Download All count. PhotoDay's free Black and White edits feature adds real value as a complement to a strong set of photos.
Speed Is a Sales Lever Too
Publish the gallery within a week when you can.
"[For one job,] we probably hit 50% less in sales than I did the year before, just because it was like a 10-day delivery." — Rose Coleman (Center Stage Photos)
The excitement is highest right after picture day, and publishing fast captures that momentum.
What the Cart Does for You
Download All shows up before parents even enter the storefront. The moment a customer is viewing their photos, Download All is front and center—just a few clicks from gallery to checkout.
"If you have a great price and you have a ton of great photos, they're going to see Download All at $99 and be like, ‘let's do it.’" — Stevie Williams (PhotoDay)
The first three packages listed are the ones that show up prominently in the cart. Make them count: your best deal, your most popular package, and something that doesn't create sticker shock. Up to five individual products can also be featured, so the add-on path is clear without parents having to dig.
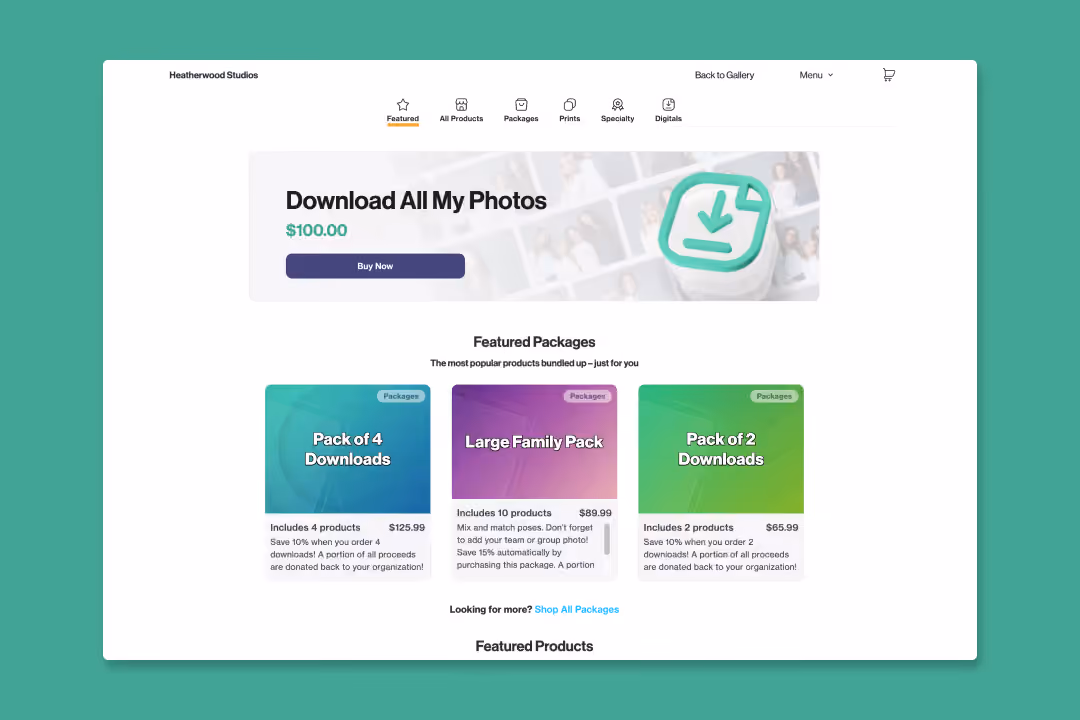
Get Download All in the cart fast, then let prints stack on top. The cart is already set up to make that happen. Your price sheet just needs to give it something to work with.
Three Things to Do Today
- Is Download All on your Price Sheet? If not, add it today.
- Is your individual download under $35? If yes, raise it.
- Is the gap between your top package and Download All more than $25? If yes, close it.
Three changes. One price sheet. Immediate impact on your next job.
Want someone to walk through your specific setup? PhotoDay’s team is here to help! Reach out through the chat bubble in PhotoDay’s Studio Panel or request a complimentary demo.

How to Photograph Commencements: The Complete PhotoDay Playbook
Commencement season is one of the most rewarding events a volume photographer can cover. It's also one of the most demanding. Long days, large crowds, tight timelines, and parents who want photos in their hands before the graduation cap comes off.
The difference between a commencement that converts and one that doesn't usually isn't the photography. It's the planning, the marketing, and the speed of delivery.
This guide covers all of it—from 8 weeks out to the final follow-up email.
Start Earlier Than You Think
The biggest mistake photographers make with commencements is underestimating how much lead time matters.
Eight weeks might sound like a lot, but it isn't! Here's why.
Your access code determines your marketing window. The earlier you create the job in PhotoDay, the sooner you can lock in your access code and start building materials. Printed programs, posters, and venue signage all need that code—and school programs often have production deadlines that will surprise you.
Miss the printed program, and you miss a distribution channel that reaches every single attendee for free.
Here's a timeline to work backward from:
- 8 weeks out: Create the job, lock in your access code, start planning materials
- 4 weeks out: Finalize marketing assets for print and digital
- 3 weeks out: Confirm venue details: indoor vs. outdoor, lighting rules, how many additional photographers are needed, and any required coverage the school expects
- 2 weeks out: Start customer outreach; send marketing emails and share information with the school for their website and social channels
- 1 week out: Reconfirm logistics with the school, sort out parking and unloading so nothing slows you down on event day
The more you can lock in ahead of time, the calmer the event day will feel.
Marketing: The Goal Is Opt-Ins, Not Just Awareness
For commencement marketing, you don't need families to buy before the event. You just need them to subscribe.
Once someone opts in, PhotoDay's automated message sequence handles the rest with reminders on day 1, 3, 5, 7, 14, and 30 after publishing. If they place an order, the messages stop. No more chasing customers to purchase! Instead, you just have to make sure the gallery lands in front of people while they're still excited.
So before and during the ceremony, your main job is to get opt-ins.
QR codes are your best tool. Two formats are available in PhotoDay:
- SMS QR code: pre-populates a text to a specific number with the access code already filled in. One tap to send, done.
- URL QR code: sends customers directly to the gallery subscription flow.

Put them everywhere you can:
- Flyers your photographers can hand out before and during the ceremony
- Posters at school entrances in the weeks leading up to the event, and at venue entrances on the day
- The printed program
- Jumbotrons or venue screens, when available
- Photographer badges or lanyards, which are useful during post-ceremony candids, when families are still gathered and taking selfies

The more touchpoints you create, the larger your opt-in list. The larger your opt-in list, the more your automated campaign can do for you.
Gallery Setup: Make Photos Easy to Find
A beautiful gallery that families can't navigate is a gallery that doesn't sell. For commencements specifically, searchability matters more than almost anything else.
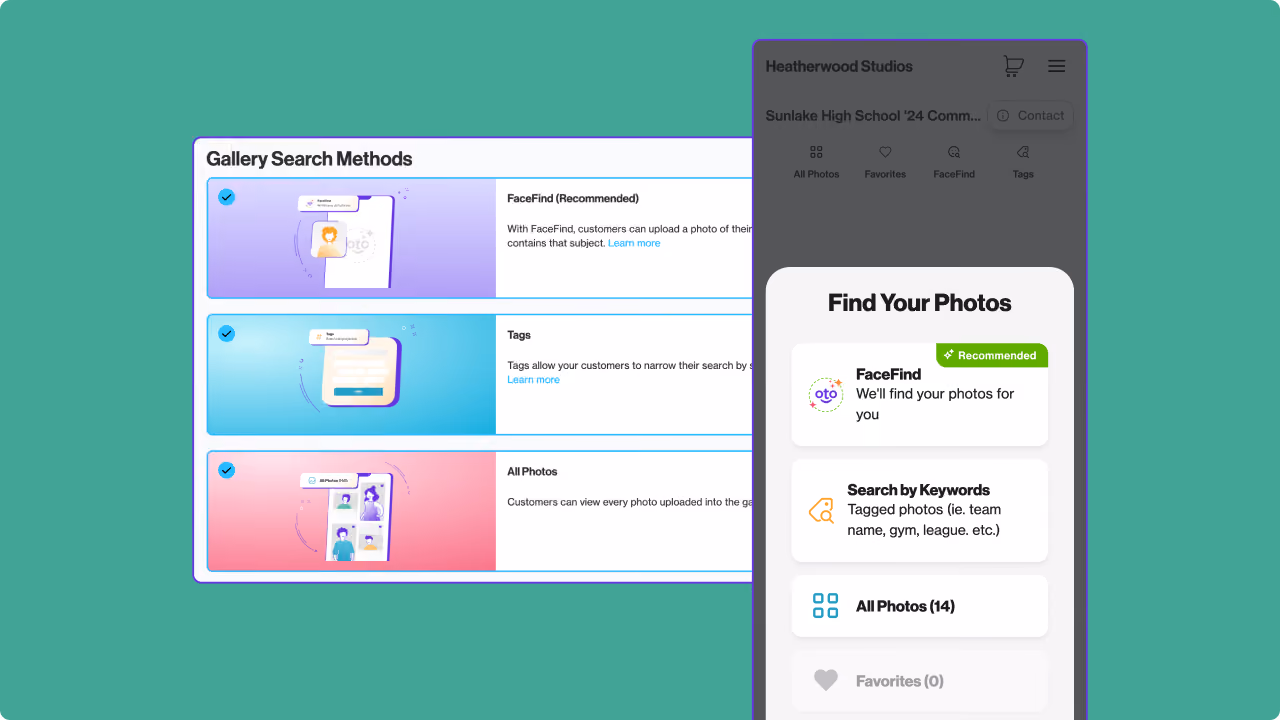
Public galleries are the strongest setup for most commencements. They're easier to share, simpler to access, and they support three search paths:
- FaceFind - Families upload a photo of the graduate, and FaceFind works its magic to show every image where that face appears: crossing the stage, candids, background appearances. For most buyers, this is the fastest path to the right photos.
- Tags - Organize images into sections like "crossing the stage," "candids," and "portraits." Helpful for families who want to browse beyond FaceFind, and useful when face coverage isn't consistent throughout the event.
- All photos - Shows the entire gallery.
For large commencements, consider disabling "all photos." Scrolling through thousands of images is frustrating, and it naturally pushes families toward the search tools that actually work. If you do keep it enabled, customers can select "find similar" from any selected image to find more photos of the same person.
For schools that require private galleries, Gallery Lookup minimizes the need for an access code. Families enter a student's name and at least one additional identifying field, and they're taken directly to the right gallery. You share one link publicly, and PhotoDay handles the rest.

Reusing subject data saves time. If you photographed senior portraits or yearbook headshots earlier in the year, you can export that data and reuse it as reference photos for commencement subject data. This reduces the need to check in every graduate at the event, and when customers are recognized and linked to subject data, the gallery can auto-filter for them.
Pricing: Downloads, Urgency, and Early Buyers
Commencement purchases tend to cluster around wallets, digital downloads, and specialty graduation items, such as tassel frames, thank-you cards, and similar products.
A few things worth knowing:
Download All has limitations in open gallery types. In public and group galleries, Download All works per face, which means every subject needs at least one photo where they appear alone. Stage-crossing images with other graduates in frame won't qualify. A portrait taken individually after the graduate exits the stage (or in a location without other people in the background) is the cleanest solution. In private galleries, Download All ties to the individual’s access code instead, so you don’t have to worry about this.
AdvancePay is worth adding. It works as a credit that customers apply toward their order, not a pre-sold package. Pair it with an incentive like free shipping or a percentage discount on a minimum spend, and it will encourage early sales. Customers who buy AdvancePay spend an average of 27% more than those who don't.
Create urgency after publishing. Free shipping for the first two weeks, a 48-hour social sharing download, a flash sale when energy starts to fade—these kinds of promotions extend the purchasing window without relying on repeated direct outreach. A practical approach: duplicate your price sheet and flip it after a deadline has passed.
Event Day Coverage: What to Prioritize
Before entering the venue, confirm batteries are charged, cards have capacity, and your team knows their positions and responsibilities.
On arrival, get physical marketing materials up immediately near entrances. A quick team meeting to confirm coverage zones and timing sets everyone up.
Coverage priorities:
- Crossing the stage: the moment most families are waiting for
- Receiving the diploma: a second, often more composed beat
- A posed portrait after the graduate exits the stage: diploma in hand, facing the camera. This is especially valuable for Download All setups and gives families a clean portrait option. It takes extra staffing to execute well at scale, but it's worth it!
- Candids throughout: entrances, reactions during speeches, graduates finding their families in the stands
- Post-ceremony family moments: hugs, photos with grandparents, friends reuniting, gifts. These images matter a lot to families and are easy to overlook when you're already thinking about packing up.
Stay 30 minutes longer than you think you need to. The post-ceremony candids are often among the most-purchased images in the gallery.
Turnaround: Fast Is the Strategy
Emotional purchasing peaks in the first few days after the event. The longer families wait to see photos, the more that energy fades.
Speed matters more than perfection here.
Cull aggressively, not selectively. Remove unusable images: completely dark frames, missed focus images, and shots that can't be saved. Don't spend too much time removing near-duplicates or choosing between two similar frames. Publish the large set and let families decide what they want.
Use AI editing tools to quickly achieve consistent color and exposure. The goal isn't a detailed edit on every image—it's getting the gallery online while cap-and-gown photos are still showing up on Instagram. PhotoDay's color correction service is only $0.10 per image. A free black-and-white post-processing option is also available!

Shoot in 4:5 when you can. This crop minimizes issues when customers order common print sizes. With a 2:3 crop, products like 8x10 can cut off heads or feet, and many customers won't manually adjust the crop, no matter how many times they’re prompted. If 2:3 is your workflow, be sure to leave extra space at the top and bottom to protect against unwanted cropping.

Protect Your Work
We know screenshot concerns are on the rise. PhotoDay's image protection settings give you options.
Auto Blur detects desktop screenshot attempts and automatically blurs the gallery. Additionally, Info Overlay places the customer's name, email, and phone number directly on the image, which helps discourage sharing. Additional mobile screenshot protections are in development.
The best part? All of these theft deterrent features are completely free and require no manual setup.
Support When You Need It
Commencement season is busy and fast-paced. If questions come up, PhotoDay's live chat is staffed by real people, and our average response time is under five minutes. We also have numerous resources, including step-by-step articles, video walkthroughs, and webinars.
The PhotoDay community is extremely active on Facebook. Join the group to connect with fellow photographers and learn useful tips and approaches from others working through similar situations.
The Short Version
Commencements run well when a solid foundation is in place: an early job setup, marketing that drives opt-ins, a gallery that makes photos easy to find, and a fast turnaround while families are still celebrating.
The photography is the part you already know how to do. This is the system that makes sure it converts.

How PhotoDay Protects Your Images
This year, one topic has risen above all others in the volume photography industry: security. Across peer communities and increasingly among the families we serve, the protection of images, intellectual property, and access rights is top of mind. As digital sharing expands, so does the responsibility to safeguard what matters most.
At PhotoDay, security is foundational to our platform, and we have always been at the cutting edge of image and data protection. You can read our recent Statement on Image Security here.
Online selling offers a world of opportunities, such as breaking sales records and enjoying more free time, but one of its pain points is the risk of image theft. Constantly evolving AI watermark removers have only exacerbated the issue.
In this blog, our CEO, Alex Kovacevic, explores the increasing issue of digital image theft through screenshots, AI watermark removers, and lack of customer awareness.
Alex also covers what PhotoDay is doing to protect your photos through newly released features and many more on the way.
Intellectual Property and Copyright Protection
Data and image protection are not the only security threats that photographers face.
I have heard significant concern from photographers across the industry regarding the proliferation of customers stealing images posted online and illegally using AI to remove watermarks or reassemble images.
The rapid advancements in AI represent a fundamental paradigm shift in the capability of technology, and with that come unique opportunities and unique risks to established business models. When used ethically, AI has the potential to enhance our industry, create advancements in productivity, and enable us to serve the needs and desires of our customers at an even higher level. When used unethically, AI can be used to steal the incredible images that are the livelihood of everyone who practices photography as a profession.
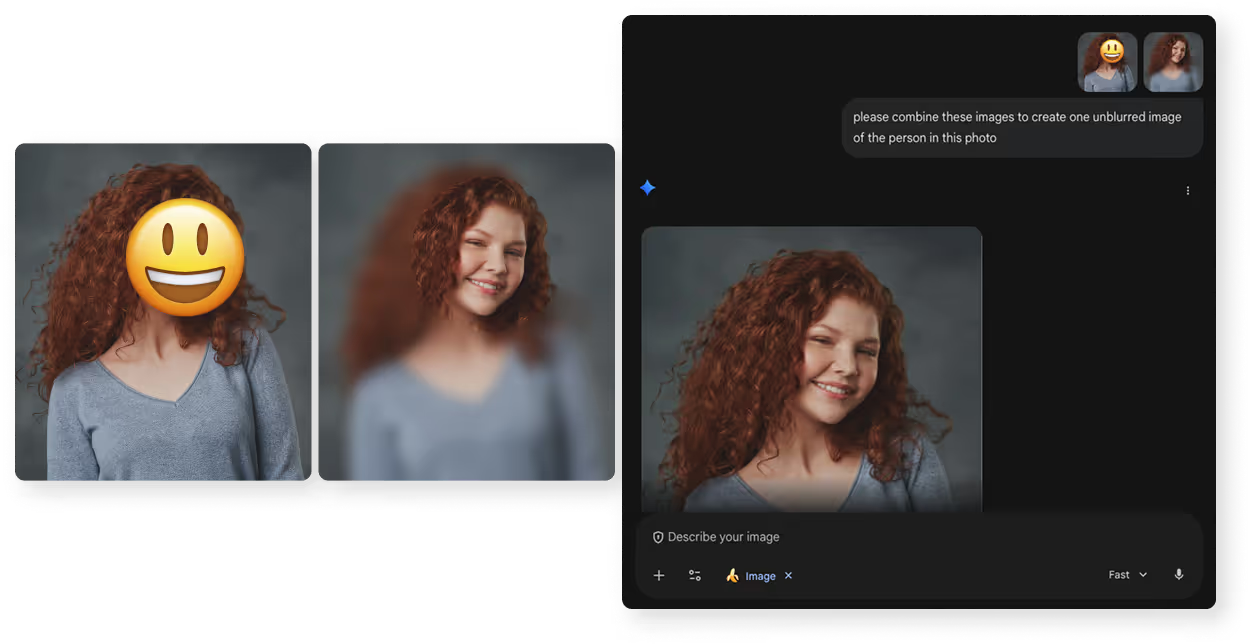
The unfortunate reality is that AI is already so powerful that with the right amount of effort, it will be able to rebuild any photo published—even with every available countermeasure deployed.
Here are some one and done prompts that has Gemini Nano Banana defeat popular watermark or blur solutions:
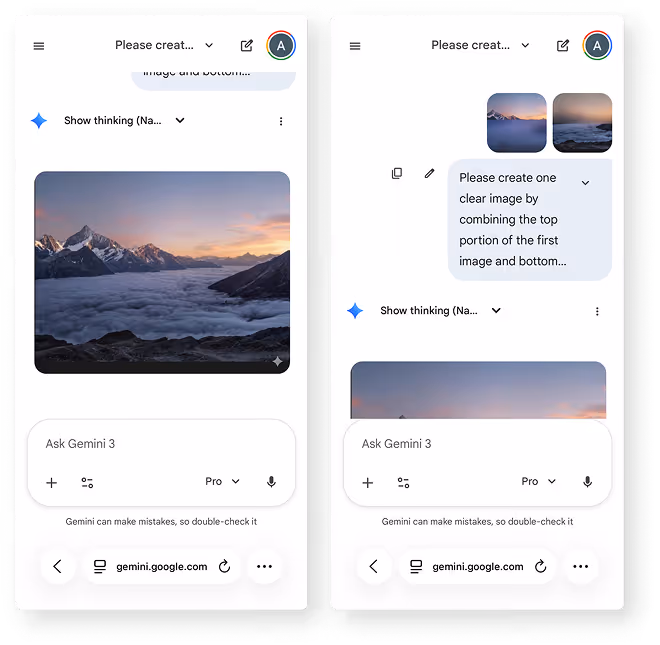
Even traditional screenshot blockers are no match for AI when pictures of screens are taken on another device:

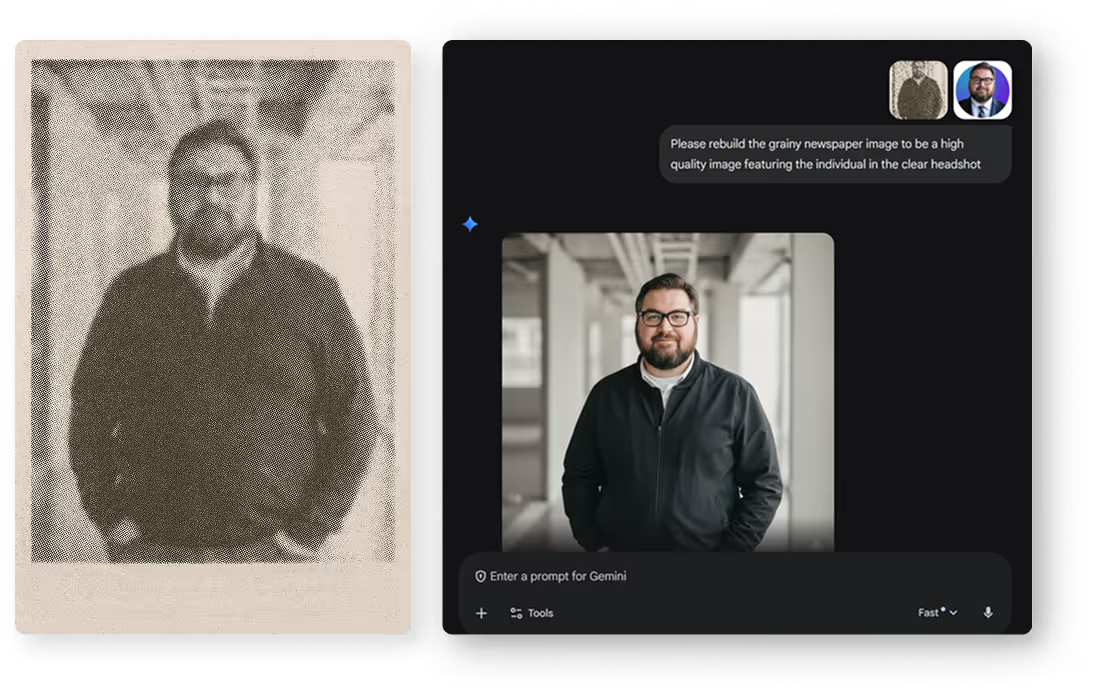
AI can even literally rebuild the most distorted image with nothing more than a reference picture:
It is disheartening to see people share tips on social media helping others break the law and commit copyright theft. We are encouraging PhotoDay users to document instances of this and share them with us, and we are exploring ways to support customers who pursue enforcement of their IP rights.
How We’re Combating Image Theft
While different platforms approach image protection in different ways, no technological solution can guarantee 100% prevention of unauthorized copying. At PhotoDay, we promise to be transparent and upfront about how our image protection measures function as we continue to research and develop solutions.
We see the fight against this being fought on 3 separate fronts:
- Technological.
No current technological solution in the market can guarantee 100% prevention of AI-driven image reconstruction. We can, however, make it harder. In the coming weeks, we will be releasing a number of technological countermeasures, some of which are already released in their first stage:- Where possible, we will deploy DRM (digital rights management) screenshot blockers (which produce a black screen when a screenshot is taken) as an additional layer of protection against mobile screenshots.
- With our new Auto Blur feature, when certain commonly used keystroke combinations for capturing screenshots on desktop devices are detected, the entire gallery of photos is automatically blurred. Auto Blur is enabled by default for all jobs in PhotoDay, making integration seamless for studios. Mobile device protections are in development. Learn more below.
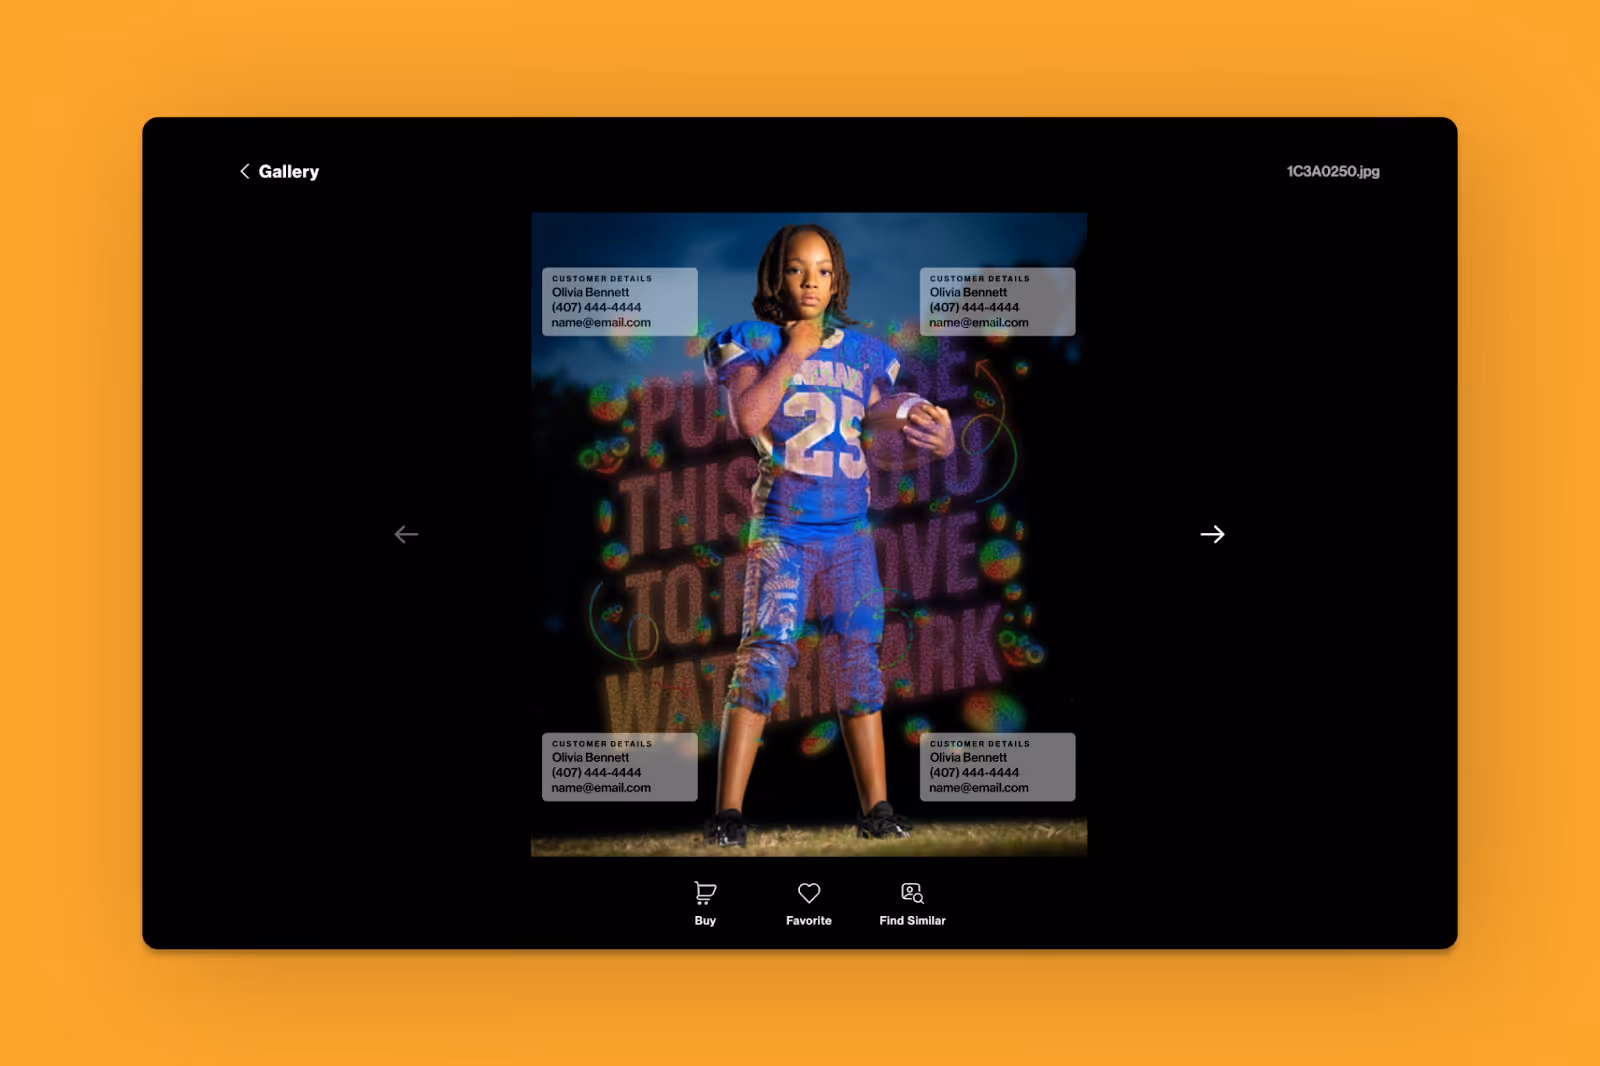
- We created an Info Overlay feature that displays the customer’s information on each photo in the gallery experience to deter them from sharing screenshots. This feature is off by default, but can be enabled for every job in PhotoDay. It works on both mobile and desktop devices. Learn more below.
- We improved our default watermark design to create greater friction for AI watermark removers.
- Commercial.
Commercial countermeasures discourage customers from stealing photos and provide a base level of compensation for the photographer in the event that they do.- We believe there is no better tool for this than PhotoDay’s AdvancePay. With AdvancePay (essentially selling a pre-pay credit the consumer redeems when they place their main order), you get the benefit of capturing cash and commitment from the customer up-front, as you would with traditional pre-pay, but you then also get the higher Average Order Value from proofing images customers love and want to buy more of.
- We will be releasing a workflow very shortly that enables photographers to publish galleries that require an AdvancePay purchase for customers to access.
- Publicity.
While no company can prevent all misuse and infringement entirely, a concentrated publicity campaign could be effective in changing behavior. Most law-abiding people do not want to think of themselves as criminals, and many do not believe what they are doing is a crime. We can change that:- In egregious cases of intentional infringement, visible enforcement may play an important role in reinforcing respect for IP rights.
- We have also seen success with watermarks that explicitly call out watermark removal and illegal copyright theft as a crime that will be reported if caught—as well as language that affirms copyright theft is not a “victimless crime,” and that it directly harms hard-working local photographers in their community.
We will continue working hard to create friction and barriers for image theft, and to create commercial workflows that reduce both the ability and incentive to steal images. However, we will always be transparent about the trade-offs and limitations of any technological solution, and be honest with our partners that there is no solution here that 100% safeguards copyright IP if you are looking to maximize Revenue/Subject by previewing images.
Protecting digital images is a constant battle against both technological advancements and bad actors, which requires ongoing vigilance, testing, and a total commitment to staying up to date with emerging threats. At PhotoDay, there is nothing we take more seriously.
— Alex Kovacevic
CEO, PhotoDay
PhotoDay’s New Image Protection Measures
On 2/26/26, we released Info Overlay and Auto Blur, the first two tools in our new Image Protection panel.
Info Overlay displays the customer’s information on each photo in the gallery experience to deter them from sharing screenshots.
Here’s how it works: We populate the customer's account information they use to log in (e.g., shopper name and email or phone), and overlay it on top of the existing rendered watermark.
The intent is to create accountability and deter customers from taking and sharing screenshots on social media platforms, since their information would be visible.
Info Overlay works on both mobile and desktop devices. It is off by default, but you can toggle it on and off for each job. If you’d like a hand enabling it for your jobs, just reach our to our customer success team!
When a customer is using a desktop computer, Auto Blur will blur the entire gallery if the browser loses focus, or when screenshot-related key combinations are detected—all while preserving a clear customer experience during normal browsing.
Auto Blur is already live in all PhotoDay galleries. No integrations. No hassle. This feature is desktop-only for now, but more mobile protections are coming very soon.
Stronger Protections. More Control.
As customer behavior and AI technology evolve, it’s important to layer protection efforts rather than rely on a singular approach.
This feature release addresses some of the main obstacles with protecting images:
- Customer-identity based protections are more effective than visual deterrents alone
- Multiple layers reduce misuse and misunderstanding
- Striking a balance between maintaining a professional gallery presentation and protecting photos
- Building protection directly into the experience
And we’re not done! We are committed to continuing to develop and release tools that offer you more control over your studio and your photos.

A Statement on Image Security from PhotoDay’s CEO
A Statement on Image Security from PhotoDay’s CEO, Alex Kovacevic
The start of the year is always an exciting time, with our industry gathering together at Imaging USA, SPAC, and SYNC. I love the opportunity they bring to catch up with long-time partners and friends, as well as to make new connections. Our volume photography community is a special group of people, and it is always energizing to kick off a new year surrounded by entrepreneurs who have dedicated their lives to capturing priceless memories.
This year, there is very clearly one subject on everyone’s mind: security.
Parents, schools, organizations, and photographers are rightfully asking tough questions about who can access kids' photos, personal data, and how safe everything really is.
Recent news stories in our industry have made people even more concerned—and I get it. When it comes to children's images, there's no room for "maybe" or "probably safe."
At PhotoDay, we have always been at the cutting edge of image and data protection.
Security runs in our blood at PhotoDay. Our original CEO and Co-Founder worked on the front lines in law enforcement for decades before founding PhotoDay. The track record of PhotoDay, and our continuing position at the forefront of security in volume photography, speaks for itself:
- PhotoDay was one of the first certified and audited SOC2-compliant volume photography platforms in the world. SOC 2 is an independent, rigorous audit (done by outside experts) that checks how well we protect customer data against unauthorized access, breaches, and other risks. It covers security, privacy, and more. For you, it means trusted third parties have verified our systems and processes are solid.
- Every image in the PhotoDay database is protected by a significant security firewall, and any image access requires authenticated login access.
- To our knowledge, PhotoDay is the only platform in the photography industry that requires mobile or email verified accounts before anyone can access a picture day gallery. This provides an extra layer of verification and security that helps ensure only authorized customers can access the gallery.
Aside from employees at the specific studio that photographed the images (and only then behind an authentication wall), and the end consumers who have to set up a verified account, and who even then can only access galleries through the information explicitly provided by their photographer—certain employees of PhotoDay are the only other people who can ever access images on the PhotoDay platform.
Only select full-time employees at PhotoDay have access to images and data whose job responsibilities require it. No investors, board members, parent company staff, or anyone outside those specific roles can ever access images or data. We never sell or provide access to photos to anyone outside of the PhotoDay ecosystem. All PhotoDay employees, whether they have access or not, go through extensive background checks before employment starts and as part of our annual SOC2 compliance audit.
Security is a constant battle against both technological advancements and bad actors, which requires ongoing vigilance, testing, and a total commitment to staying up to date with emerging threats. At PhotoDay, there is nothing we take more seriously.
— Alex Kovacevic
CEO, PhotoDay
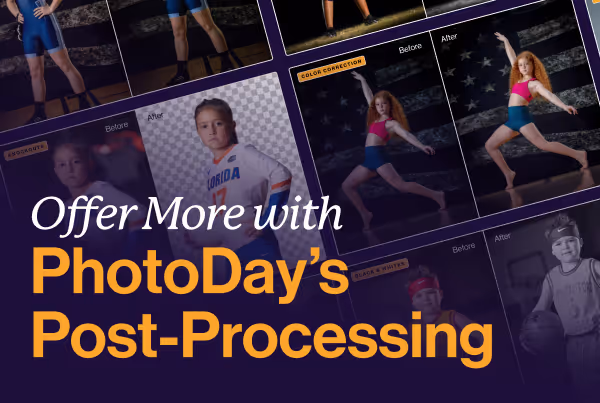
Offer More with PhotoDay's Post-Processing
Expand your photo inventory with PhotoDay’s post-processing services
Every photographer knows that the work doesn’t end on picture day. After the photos are taken and imported, the editing begins: culling, color correction, extractions, cropping, retouching, composites, and more, depending on your end product.
And with hundreds of subjects comes thousands of photos, making it crucial to have an efficient, effortless workflow that saves you priceless time.
PhotoDay offers integrated knockout, color correction, and black and white editing to streamline your post-picture-day workflow, so you can publish galleries and start selling faster than ever.

Why Worrying About Image Theft Is Holding Your Studio Back
As the volume industry first started transitioning from paper order forms to online selling, volume photography studio owners had to take a leap of faith. “Will image-first selling work for me?” “How will my sales cycle be affected?” “Will parents really love this new process?” These are all valid questions worth considering! But as countless data and studio success stories prove, it pays off to be bold.
Online selling introduces a world of opportunities—blasting through sales records, enjoying precious free time, and more—but one pain point it’s introduced is image theft. If you’ve ever lost sleep over parents screenshotting galleries, the rise of AI watermark removal, or whether you should “go back to pre-pay,” you’re not alone. These topics are dominating online conversations, but they may be distracting you from what really grows your business.
In a recent episode of The Volume Vault podcast, Emily Davis, owner of Click Studios and The Volume Vault, sat down with Lisa Mallis, Co-Founder and COO of PhotoDay, to tackle one of the most emotionally charged topics in the volume photography industry today: image theft.
In the episode, they unpack why worrying about digital theft is not what modern volume photography studios should be focusing on—and what actually helps you sell more. It’s a wonderful episode full of expert insight and thoughtful discussion, so be sure to listen to the podcast for yourself!
Why This Matters to Volume Photographers
Photographers often feel torn between protecting their work and building a thriving business. Owning and caring for a creative business can lead to defensive emotions clouding logical explanations.
“When we operate out of fear—fear of theft, fear of misuse, fear of losing a few bucks—we end up making decisions that cost us thousands to save pennies.” — Emily Davis
Instead of building sales, many studios get stuck in endless debate threads and half-baked protective tactics that don’t actually move the needle.
Image Theft Is Real. But It’s Not the Problem You Think
Let’s be clear: unauthorized photo sharing and screenshots happen. But they’re not the roadblock to growth that many photography studios think they are.
“Yes, there's a threat. Yes, there will always be somebody who's going to steal from you…But if you put all of your time and energy worrying about that and not your 98% of the people who want to buy from you, you'll never succeed.” — Lisa Mallis
In other words: focus on the people who choose to pay you, not the small minority that never intended to. That’s where your energy belongs, rather than policing watermarks or retreating from online selling.
The Hidden Cost of Going Back to Pre-Pay
One common reaction is to go back to shooting pre-pay only, thinking it will stop theft.
But here’s what that really does:
“Going back to pre-pay is not protecting your worth. It is putting a ceiling on your income.
And when you require pre-pay, you're limiting participation. You're limiting sales. You're limiting the number of images that you can actually offer to a client. — Emily Davis
Pre-pay locks you into outdated workflows and limits what you can offer customers:
- Only one image per order form
- No proofing before purchase
- Reduced sales opportunities
- More operational headaches
On the other hand, modern online selling gives families more choice and value, which turns into higher sales, bigger order averages, and happier customers.
Image-First Selling Changes the Game
A huge difference between pre-pay and post-pay selling is psychology: people buy more when they see what they’re buying.
“You want people to see the images and go, ‘Well, I couldn't possibly not buy that.'” — Emily Davis
Customers don’t just want one snapshot. They want the smile, the goofy pose, the game face, the team photo, the action shot. When you give customers a gallery with multiple beautiful images, they feel both confident and excited to purchase.
Satisfied, emotionally engaged customers with a large inventory of photos to choose from lead to higher average order values, which boosts your overall revenue.
Watermarks Help, But Don’t Solve the Issue
Many photographers have poured countless hours into repeatedly updating their watermarks to combat AI watermark removers. But there’s a catch:
“The minute photographers find the greatest watermark, they go and run it through every removal tool and train the AI on how to remove it.” — Lisa Mallis
That creates a frustrating cycle where you spend time on tools that don’t solve the problem and, in the process, make the buying experience worse for legitimate customers.
It’s completely normal and understandable to feel violated and emotional about having your work shared or screenshotted without your permission. However, emotions shouldn’t dictate your business strategy.
“The fear around image theft and people posting watermarks is often really inflated, and it's an actual revenue loss.
I think the real risk that people should be looking out for is wasting your time trying to protect $20, instead of trying to use your time to go out and book a $20,000 league.” — Emily Davis
While better watermarks aren’t a foolproof solution, PhotoDay takes great care to update our default watermark to be as resistant to AI removers as possible. Check out our recent webinar with Pixnub’s Damon Bell: AI-Proof Your Watermark.
What You Should Be Spending Your Time On
So if you shouldn’t be policing screenshots or retreating to pre-pay or paper order forms, what should you be focusing on instead?
1. Sell to the People Who Want to Buy
“The answer is simple. You focus on the 98%. You look at the people who are buying from you—your best performers, your best organizations, your best leagues, your best schools—and you go find more of them.” — Lisa Mallis
Your business growth comes from serving communities that value your work, not chasing down every complaint thread.
2. Deliver a High-Value Experience
Modern galleries, high-quality photos, multiple pose options, digital downloads, and easy mobile checkout help parents see the value and feel confident about buying their photos.
This aligns exactly with what PhotoDay users see when they switch to selling with our online galleries: more products purchased, more digital downloads sold, and higher profitability.
3. Know Your Target Audience
If you’re selling to communities that can’t afford higher-value products, you’ll always feel friction. Price your services based on the audience you want to serve and grow with confidence.
Looking Ahead: Building Trust
As parents continue moving toward mobile and online experiences, volume photographers must adapt.
“Photography needs to continue evolving as a service.” — Lisa Mallis
This means building trust with customers, delivering value first, and meeting modern expectations for online buying. Not retreating to old workflows that limit growth.
“Look at consumer trust online. People tend to spend more money with brands they know and trust. You don't get that in the pre-pay environment.
And that's one of the things here at PhotoDay that we take a lot of pride in—brand equity. We want your customers to know that when they're buying your images through PhotoDay, they're going to get what they pay for.
Consumers who trust the brand they're buying from spend more money with that brand year over year, and they come back over and over again.” — Lisa Mallis
Go beyond building trust as a business, and build trust as an individual! It’s much harder to steal from someone when you know them, when your kids are on the same teams, and you’re going to the same community events. Just getting involved in your community has incredible payoffs.
Make Decisions That Grow Your Studio
While image theft feels personal and frustrating, fear-based decisions often cost photographers far more money than the theft itself.
At the end of the day, worrying about image theft is like worrying about your house being broken into. It feels big in the moment, but it shouldn’t prevent you from building the life you want.
Instead of operating out of fear, focus on what grows your business: high-value galleries, modern e-commerce workflows, and serving the customers who want what you offer.
💡Ready to move forward? If you’re still using paper forms or thinking about switching platforms, give PhotoDay a try. Start for free and see how modern online selling can help you grow revenue and simplify your workflow.
Check out our additional publications
Get more info on PhotoDay and begin your picture day transformation!

